User Management
Mobile
Web
Mobile
Users
What Are Users in ManyFastScan?
Users are individual accounts assigned to members of your team. Each user has a login, role, and permissions that define what they can see or do inside the app. Managing users properly ensures that tasks are completed
Users are individual accounts assigned to members of your team. Each user has a login, role, and permissions that define what they can see or do inside the app. Managing users properly ensures that tasks are completed
SS Menu > General Settings > Users
Step 1. Click on the "+" plus sign in the upper right hand corner.
Step 2. Create User Profile and Save.
Web
Add New Users
1. Select 'Add User'
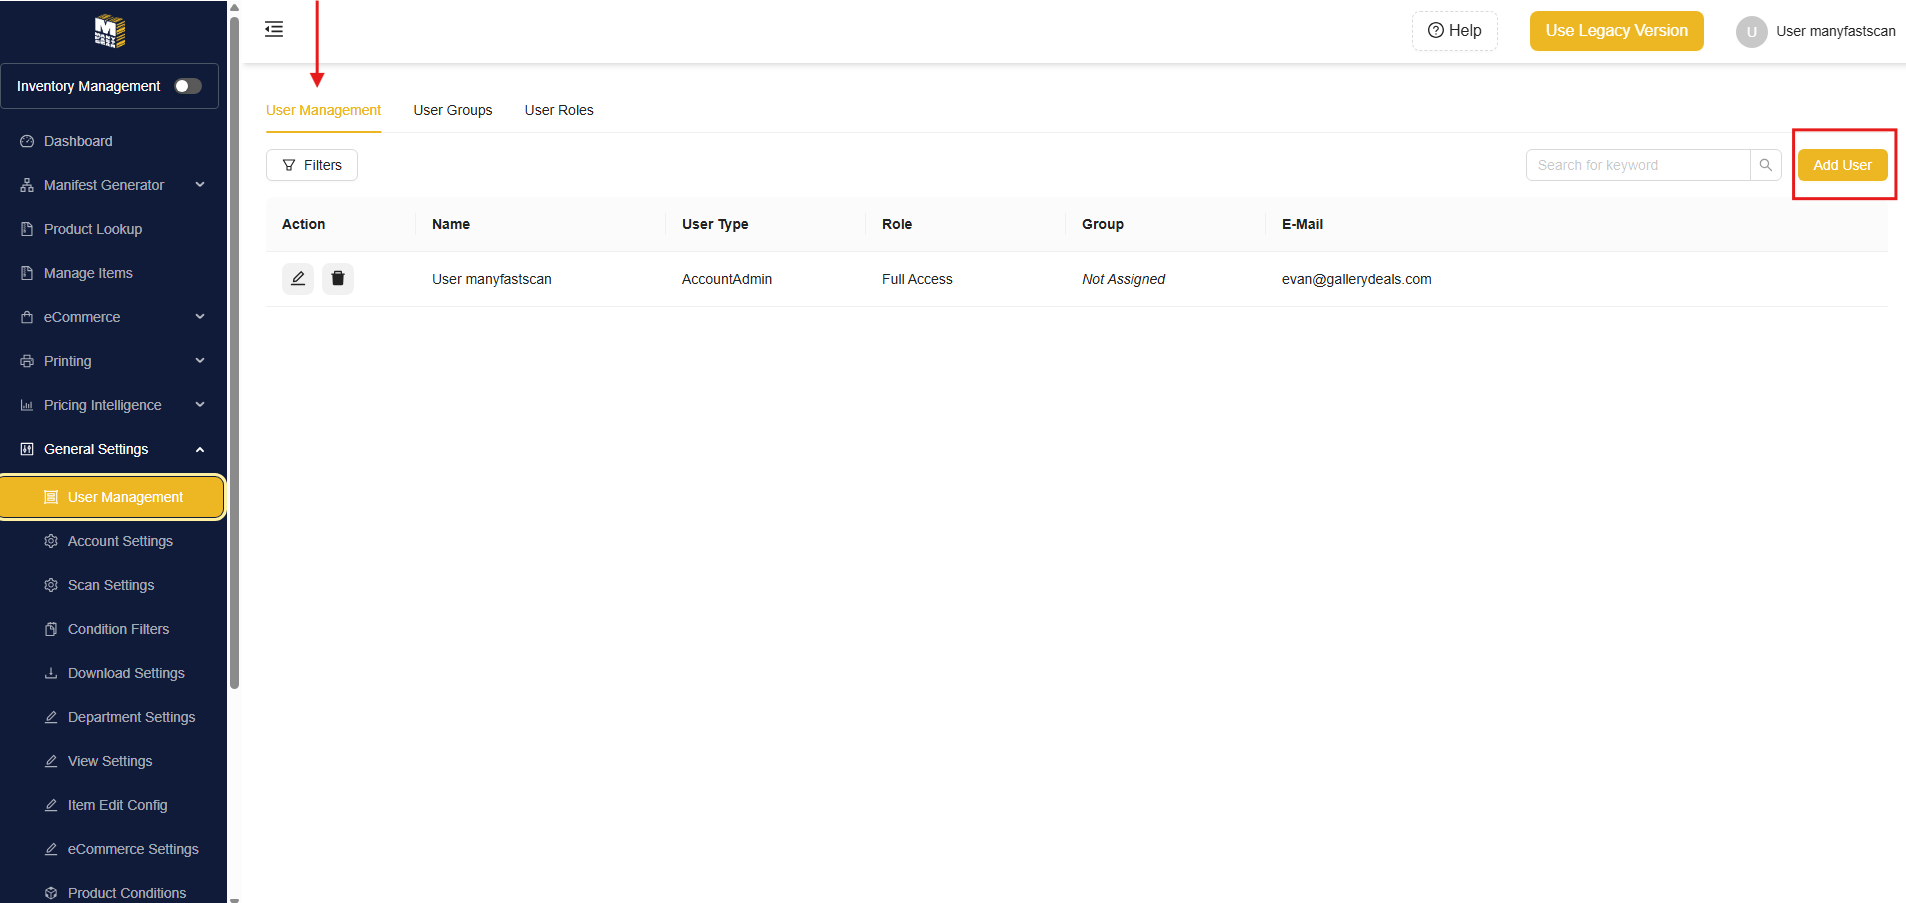
2. Provide User's First Name, Last Name, Email, and Set Password
3. Set the User's Employee Type
Admin - Full Access
Employee - Cannot Create/Delete Manifest Groups. Can Create but not delete Manifests. Will not have access to User Groups, User Roles, User Management, Account Settings, or Billing
Edit Existing Users
1. Select the pencil icon next to the user you wish to edit
2. Edit the fields you wish to change
3. In this screen you can add a Custom Identifier. This will add a suffix to a user manifest when Manifests are auto-generated in the Manifest Groups created process on the mobile app
Remove Users
1. Select the trash can icon and confirm. You will be billed for this user until the end of the billing cycle. If you are removing/adding Users at the same time, remove the users first and then add. Otherwise, you will be billed for an additional license.
Assign User Groups & Roles
User Roles are created in the User Role Section of General Settings. You can assign roles during the User creation process or Edit User process
User Groups
User groups are for identification purposes only. This is most useful when managing permissions for External companies
Create a User Groups
1. Navigate to the 'User Groups' tab and click 'Add User Group'
2. Fill in the required fields and click 'Add'
This is for informational purposes only. Users in the same group can have different User Roles.
User Roles
User Roles will restrict users from accessing specified pages, settings, and fields
Creating a User Role
1. Navigate to the 'User Roles' tab and click 'Add User Role'
2. Add a Role Name
3. Select Manifest Visibility. This determines access privileges for Manifests
- All Manifests - All Manifests on the account (Use for Admin)
- Own Manifests Only - Only Manifests which the user creates
- Own & Assigned Manifests - Only Manifests which the user is assigned and creates (Use for Internal & External Cataloguers)
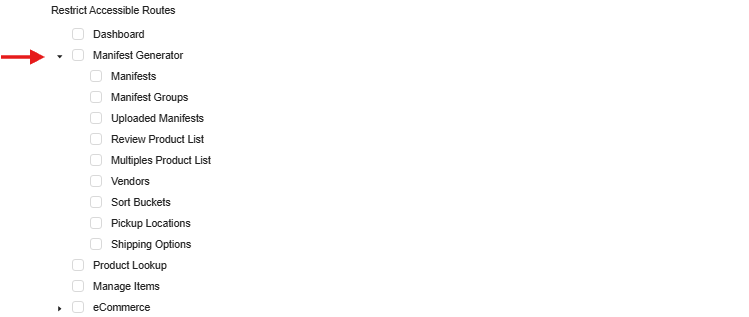
4. With Restrict Accessible Routes, check the boxes for the pages you want this User Role to have access to. Click the triangle to expand the hierarchy
4. To select a Model for manyfastscan, refer to the 'Item Details' Model. You have the ability to allow users to Read or Edit a field.
5. The permission for Creating, Editing or Deleting object on the Web or App is in the Functionality Section. Click 'Add' when complete
Related Articles
User Roles
User Roles What is a User Role in manyfastscan? A User Role in ManyFastScan defines what a user is allowed to see or do across the platform. Roles determine permissions such as who can scan items, who can manage manifests, who can view dashboard ...Personal User Settings (App)
Personal User Settings (App) Manage your Personal User Settings, such as: First & Last Name Email Password or reset password Delete User Account Step 1. Tap the ☰ Menu > General Settings Step 2. Navigate to and tap on "Personal User Settings." Step ...Scan Settings
Allows users to customize how the app handles item scanning, data entry, labeling, and pricing. These settings are designed to configure workflows for various use cases, including auctions, retail, ecommerce, pallet manifesting, and inventory ...View Settings
Controls which fields are visible and required in different parts of the system. This allows you to simplify workflows, enforce data standards, and tailor input screens to match your process. Each section defines attribute behavior during specific ...Custom Fields
Custom Fields allow you to create and manage data entry fields to capture additional information specific to your business needs. These fields can be used to store data not covered by default fields, enabling more tailored item tracking and ...