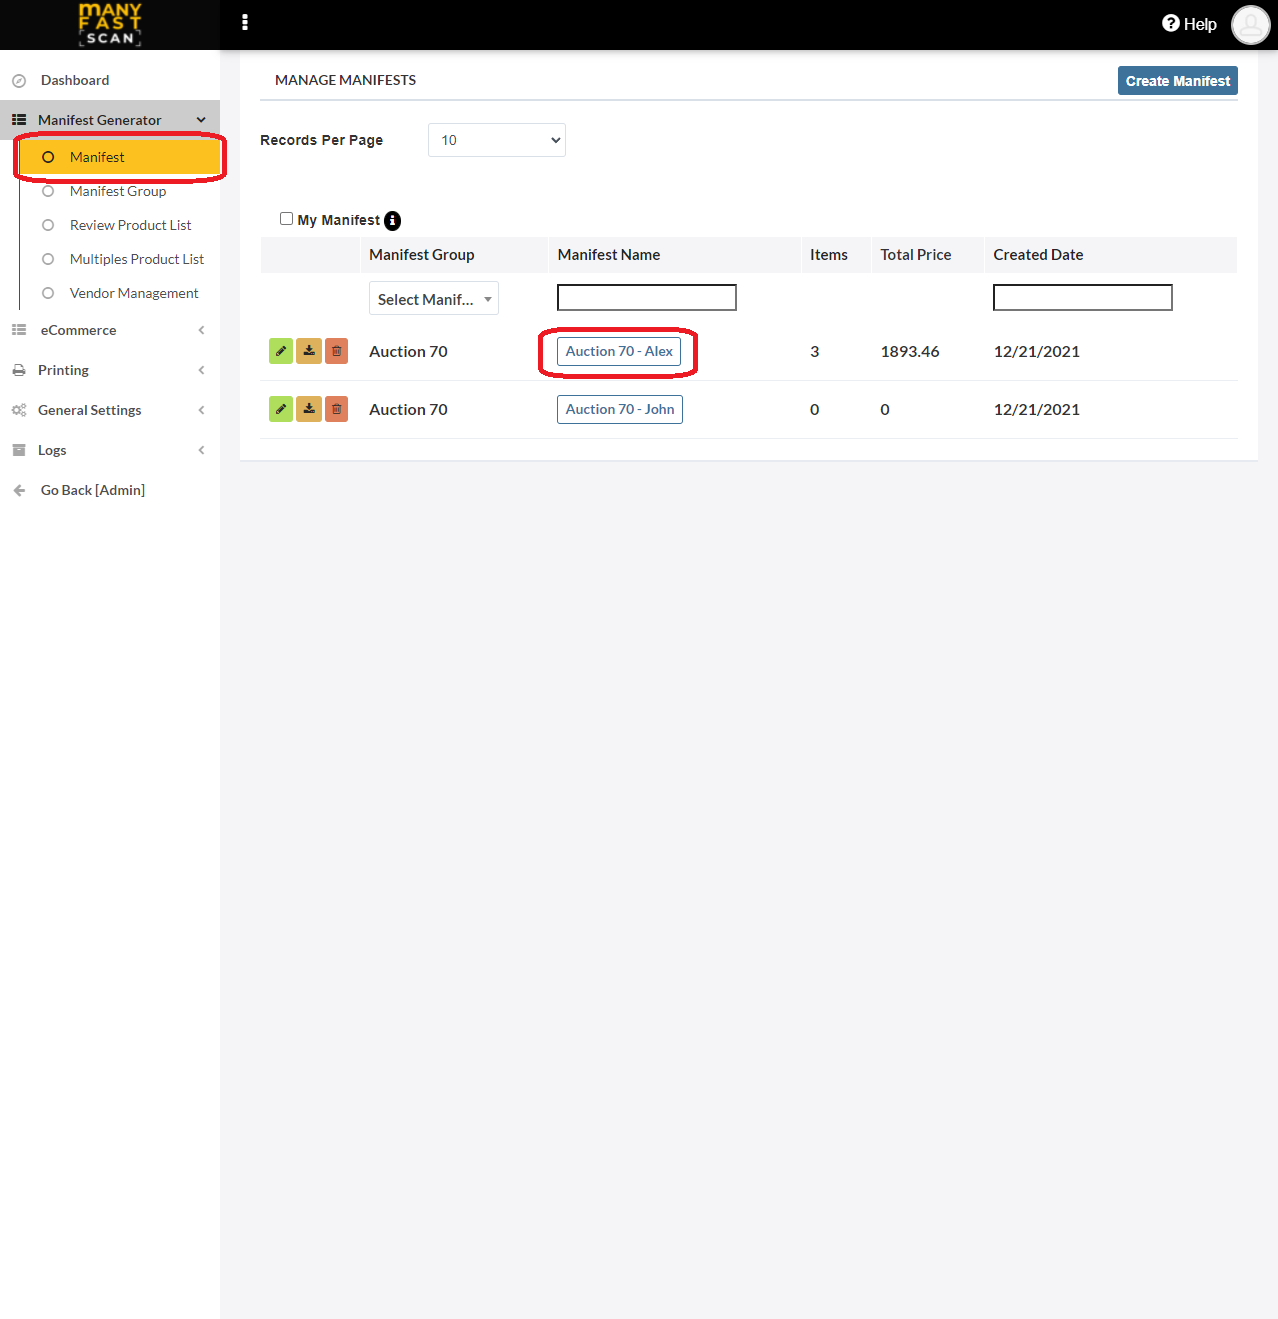
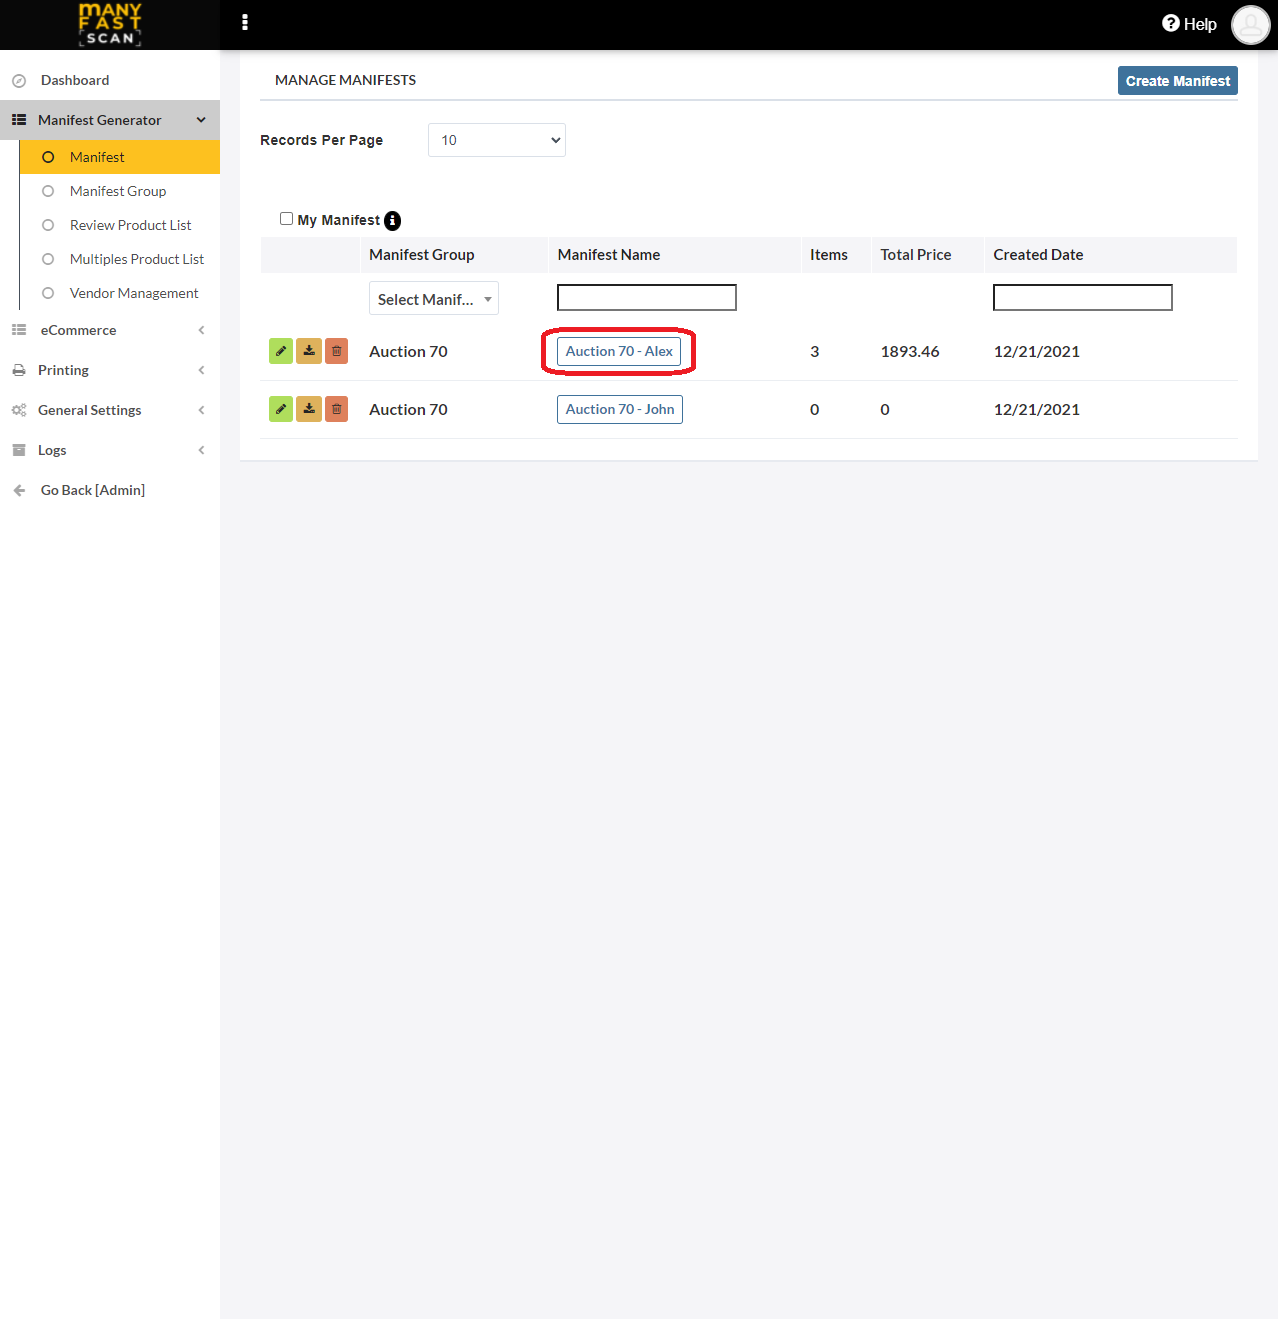
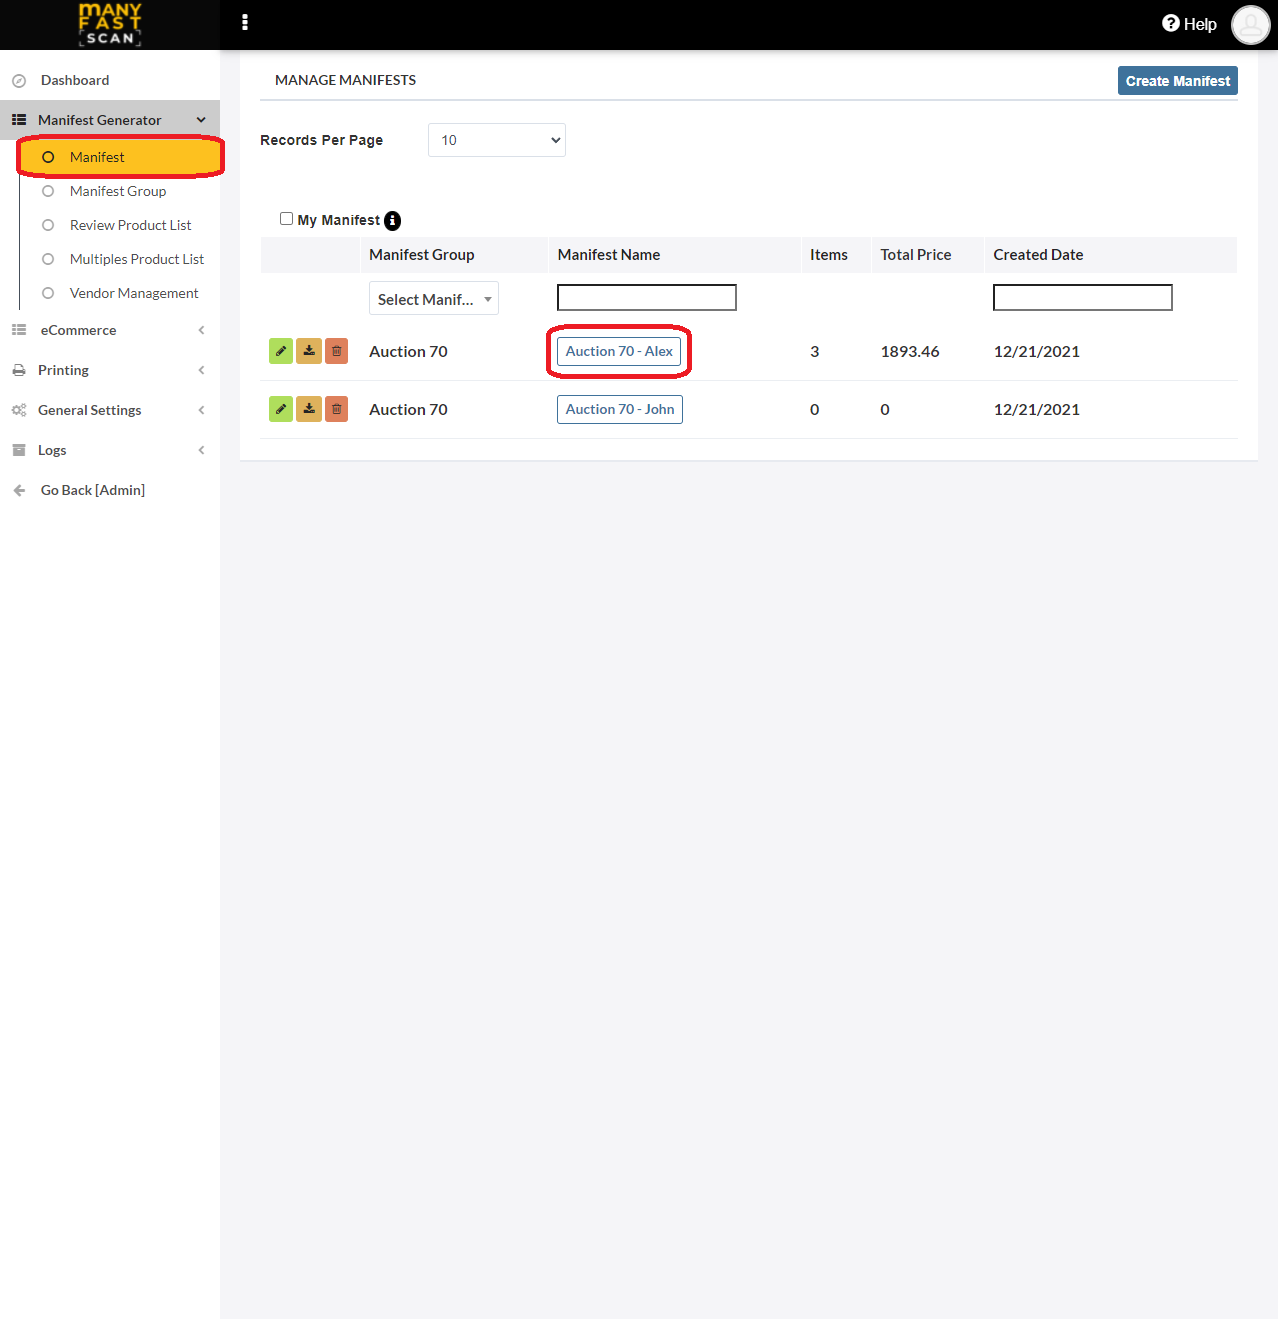
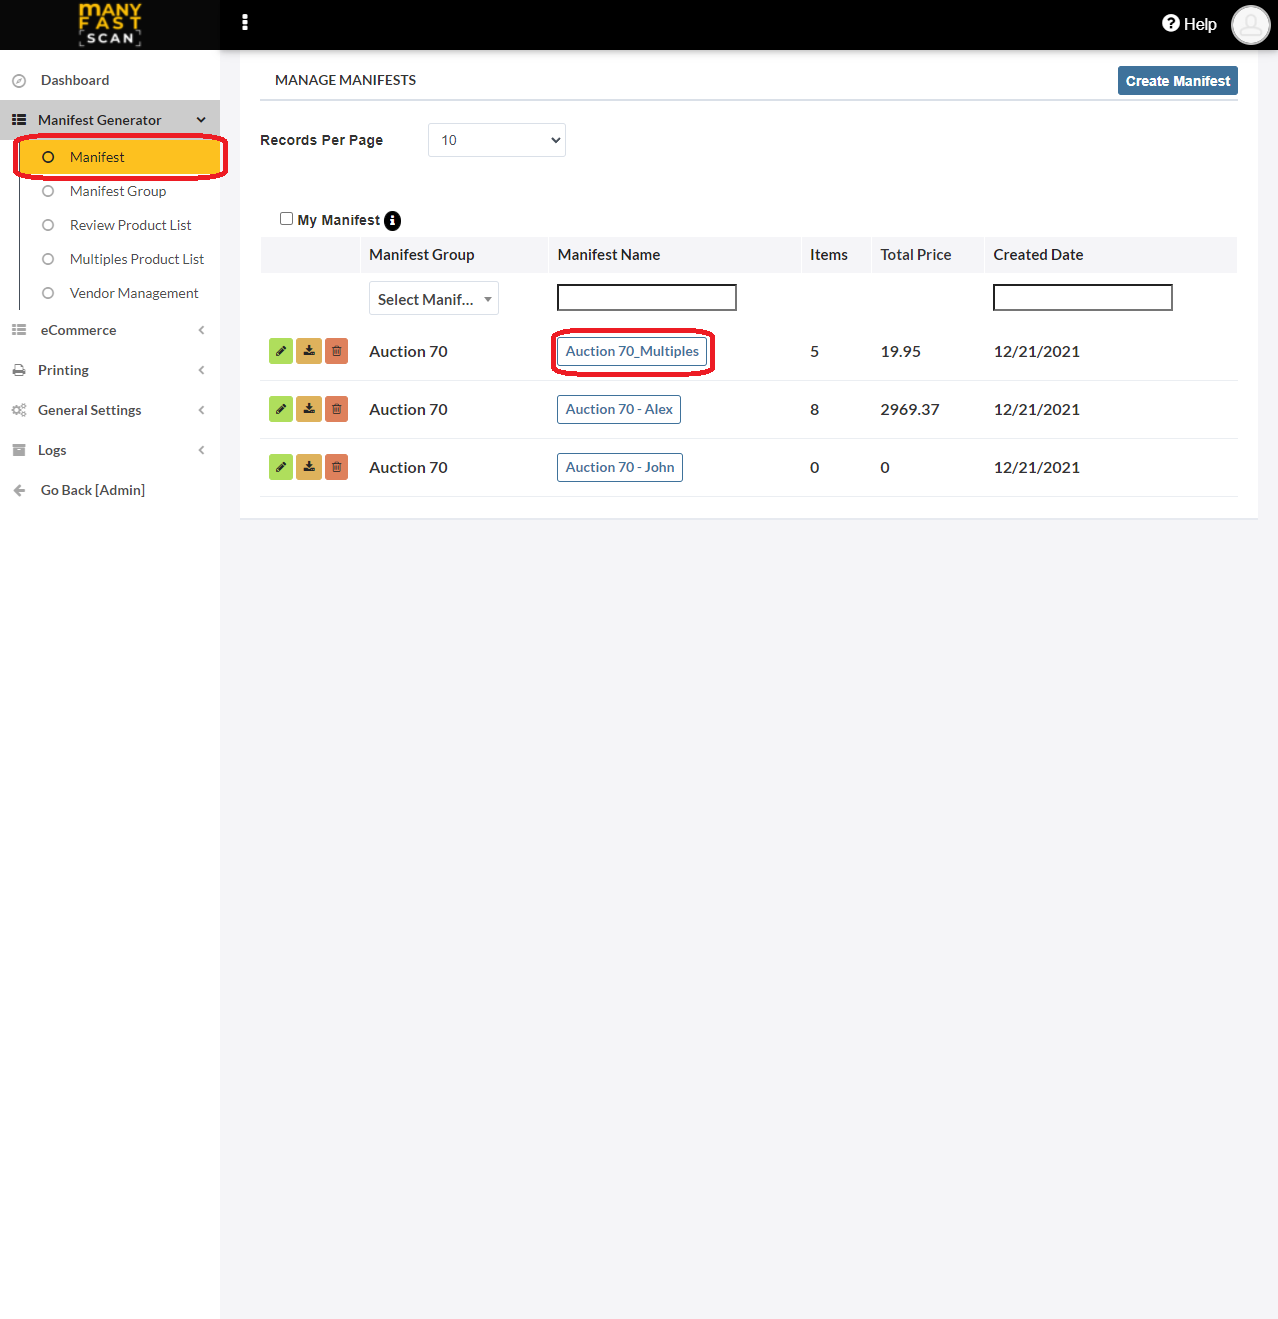
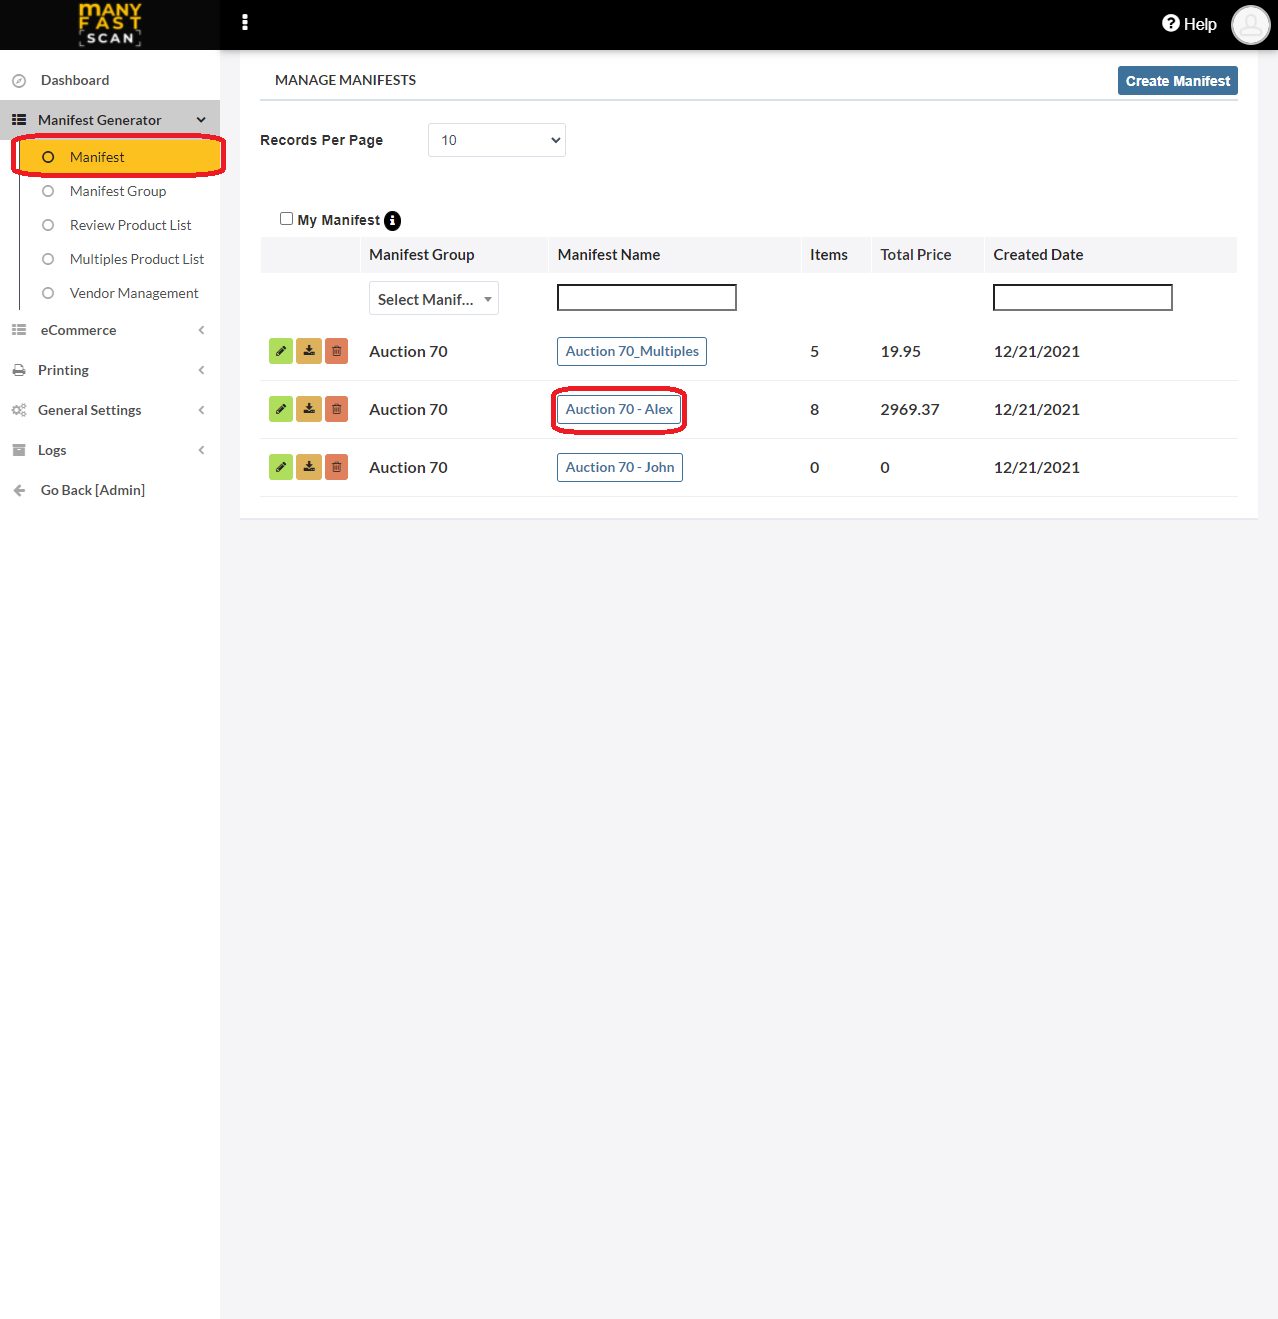
¶ View Manifest items
To view all the items for a specific Manifest open the Manifest overview view.
- In main menu, select the Manifest Generator menu option
- Select Manifest option
- Click on specific Manifest
- Scroll up and down to see all items
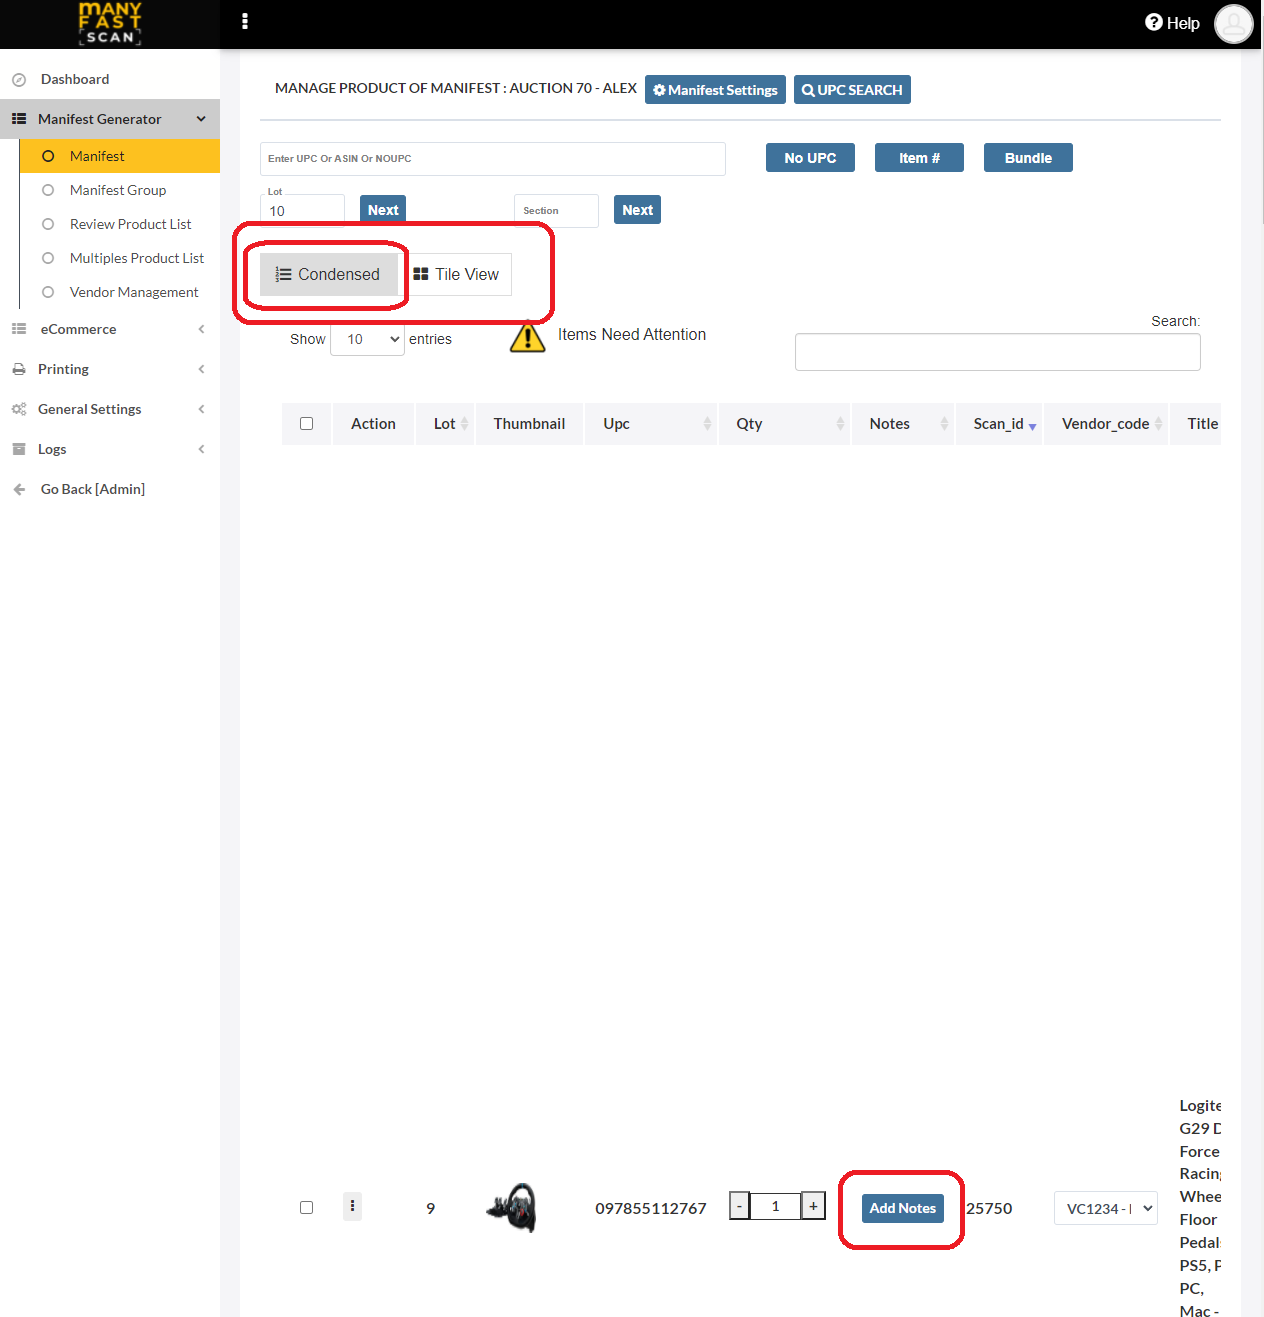
- Switching between
CondensedandTile Viewcauses the items list layout to change
_-_copy.png?style=centerCustomCss)
- Switching between
¶ Add UPC Manifest item
To add an UPC Manifest item, follow the following steps:
- In main menu, select the Manifest Generator menu option
- Select Manifest option
- Click on specific Manifest

- Type in the UPC in the "Enter UPC or ASIN" textbox at the top of the screen
_-_copy.png?style=centerCustomCss)
- Upon successful UPC barcode scan, new item should be created
- Upload photos by either choosing the ones already taken or taking new ones
- Click on Next after you are done uploading photos
- Input More Details for the new Manifest item
- Depending on your settings, you will either need to press on Save And Print UPC or Save UPC.
- If the price wasn't found by our MFSEngine, you will be prompted to enter the estimate price for the manifest item you scanned
¶ Video Guide
¶ Add Item# (retailer SKU) Manifest item
To add an Item# Manifest item, follow the following steps:
- In main menu, select the Manifest Generator menu option
- Select Manifest option
- Click on specific Manifest

- Click on Item # button
- Decide if you want to add UPC with the SKU# to potentially improve accuracy
- Select the integration which should be used to lookup the SKU#
_-_copy.png?style=centerCustomCss)
- Upon successful Item# barcode scan, new item should be created
- Upload photos by either choosing the ones already taken or taking new ones
- Click on Next after you are done uploading photos
- Input More Details for the new Manifest item
- Depending on your settings, you will either need to press on Save And Print or Save.
- If the price wasn't found by our MFSEngine, you will be prompted to enter the estimate price for the manifest item you scanned
¶ Video Guide
¶ Add NoUPC (custom) Manifest Item
To add an NoUPC Manifest item, follow the following steps:
- In main menu, select the Manifest Generator menu option
- Select Manifest option
- Click on specific Manifest
- Click the No UPC button
_-_copy.png?style=centerCustomCss)
- Input NoUPC item details
- Upload photos by either choosing the ones already taken or taking new ones
- Click on Next after you are done uploading photos
- Input More Details for the new Manifest item
- Depending on your settings, you will either need to press on Save And Print or Save.
¶ Video Guide
¶ Scan already existing Manifest Item
manyfastScan supports scanning label of already existing manifest item. After scanning the label, new manifest item will be added which will contain all the information and photos of a manifest item to which the scanned label belongs to.
- In main menu, select the Manifest Generator menu option
- Select Manifest option
- Click on specific Manifest
- Type in the
?scan_idin the "Enter UPC or ASIN" textbox at the top of the screen- Alternatively use the barcode scanner to scan the existing label barcode
_-_copy.png?style=centerCustomCss)
- Alternatively use the barcode scanner to scan the existing label barcode
- Upon successful barcode scan, new item should be created
- Upload photos by either choosing the ones already taken or taking new ones
- Click on Next after you are done uploading photos
- Input More Details for the new Manifest item
- Depending on your settings, you will either need to press on Save And Print or Save.
- If the price wasn't found by our MFSEngine, you will be prompted to enter the estimate price for the manifest item you scanned
¶ Video Guide
¶ More details and printing options
After uploading photos for new manifest item, you are presented with enter more details modal. On this modal you will see either both Save and Print and Save, or just Save button – depending on „Label Print Option“ scan setting.
- Automatically Print Label – label will be automatically printed when you click the Save button
- Print Only When Button Is Clicked – label will be printed only if you click on Save and Print button
¶ Save and Print Option
Clicking on Save and Print on more details view, you will either print label and move to next page (if you are already connected to a printer).
¶ Save Option
If you have „Label Print Option“ scan setting set to „Automatically Print Label“
- Clicking on Save on more details view, you will either print label and move to next page (if you are already connected to a printer)
If you have „Label Print Option“ scan setting set to „Print Only When Button Is Clicked“
- You will either get prompted to enter the estimate price or you'll be returned to manifest item overview page.
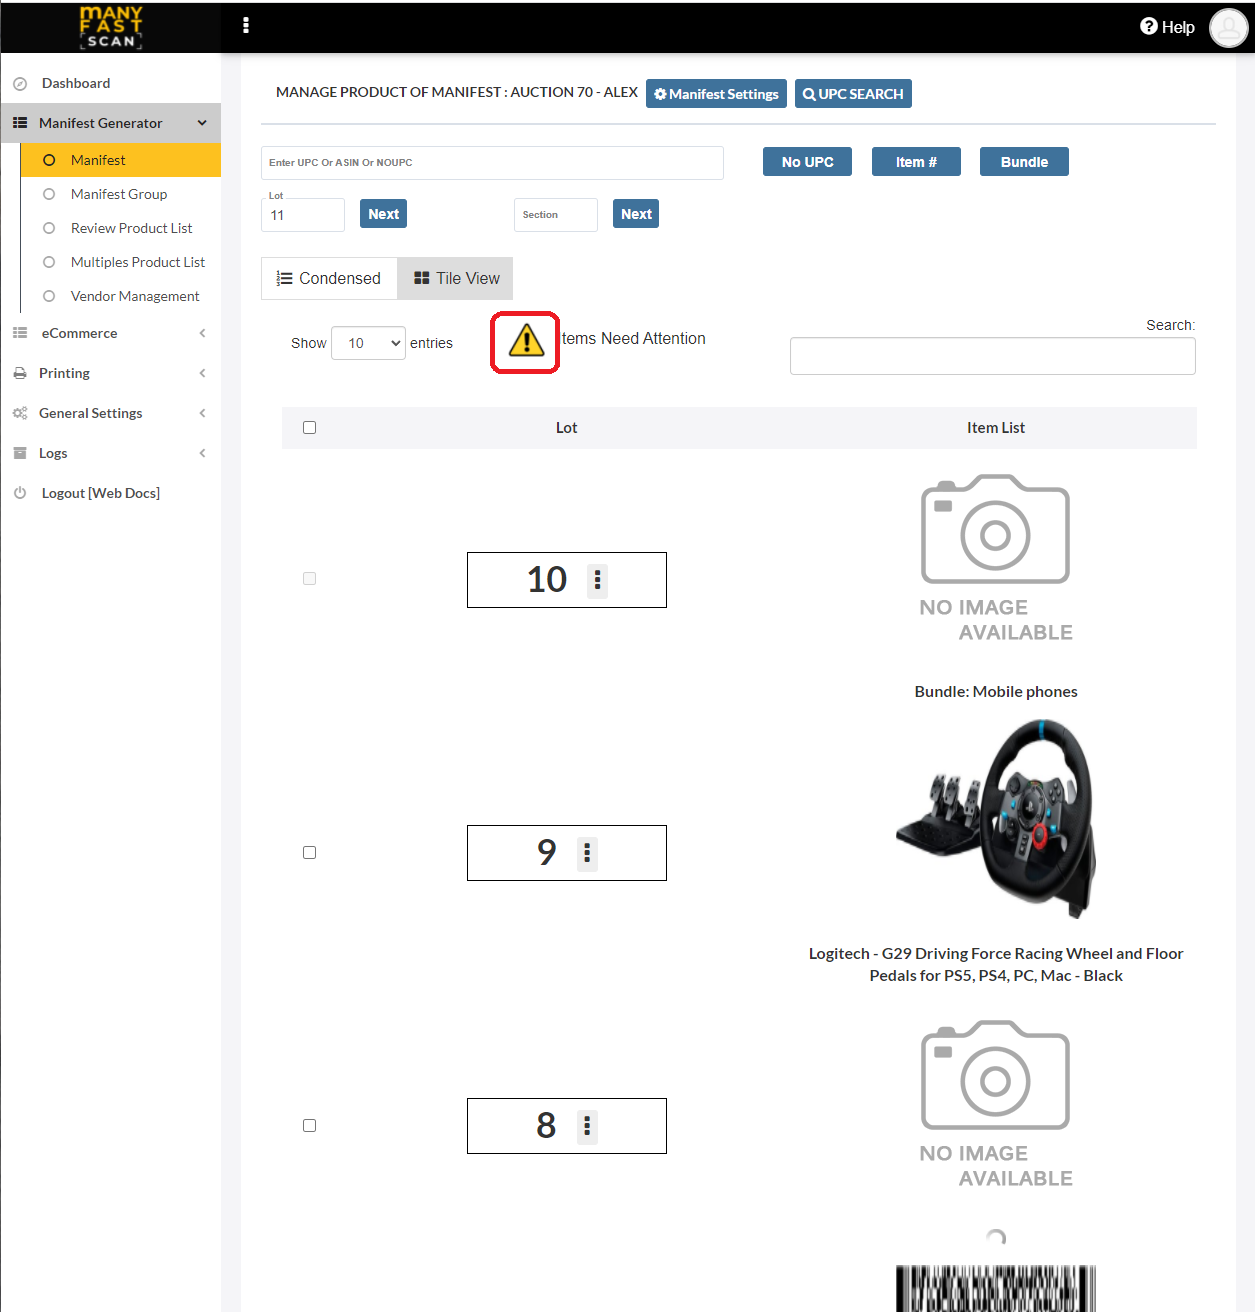
¶ Items Need Attention Filter
If our MFSEngine wasn't able to locate the scanned item, it will be marked as an item that needs attention. Such marker is yellow warning triangle located on top left of the card. These items require your attention, meaning you should enter the title and other details for the item.
Checking the „Show „Items Need Attention“ only“ checkbox, you will only see the items that have missing data.
- In main menu, select the Manifest Generator menu option
- Select Manifest option
- Click on specific Manifest

- Click „Items Need Attention“ Icon
¶ Video Guide
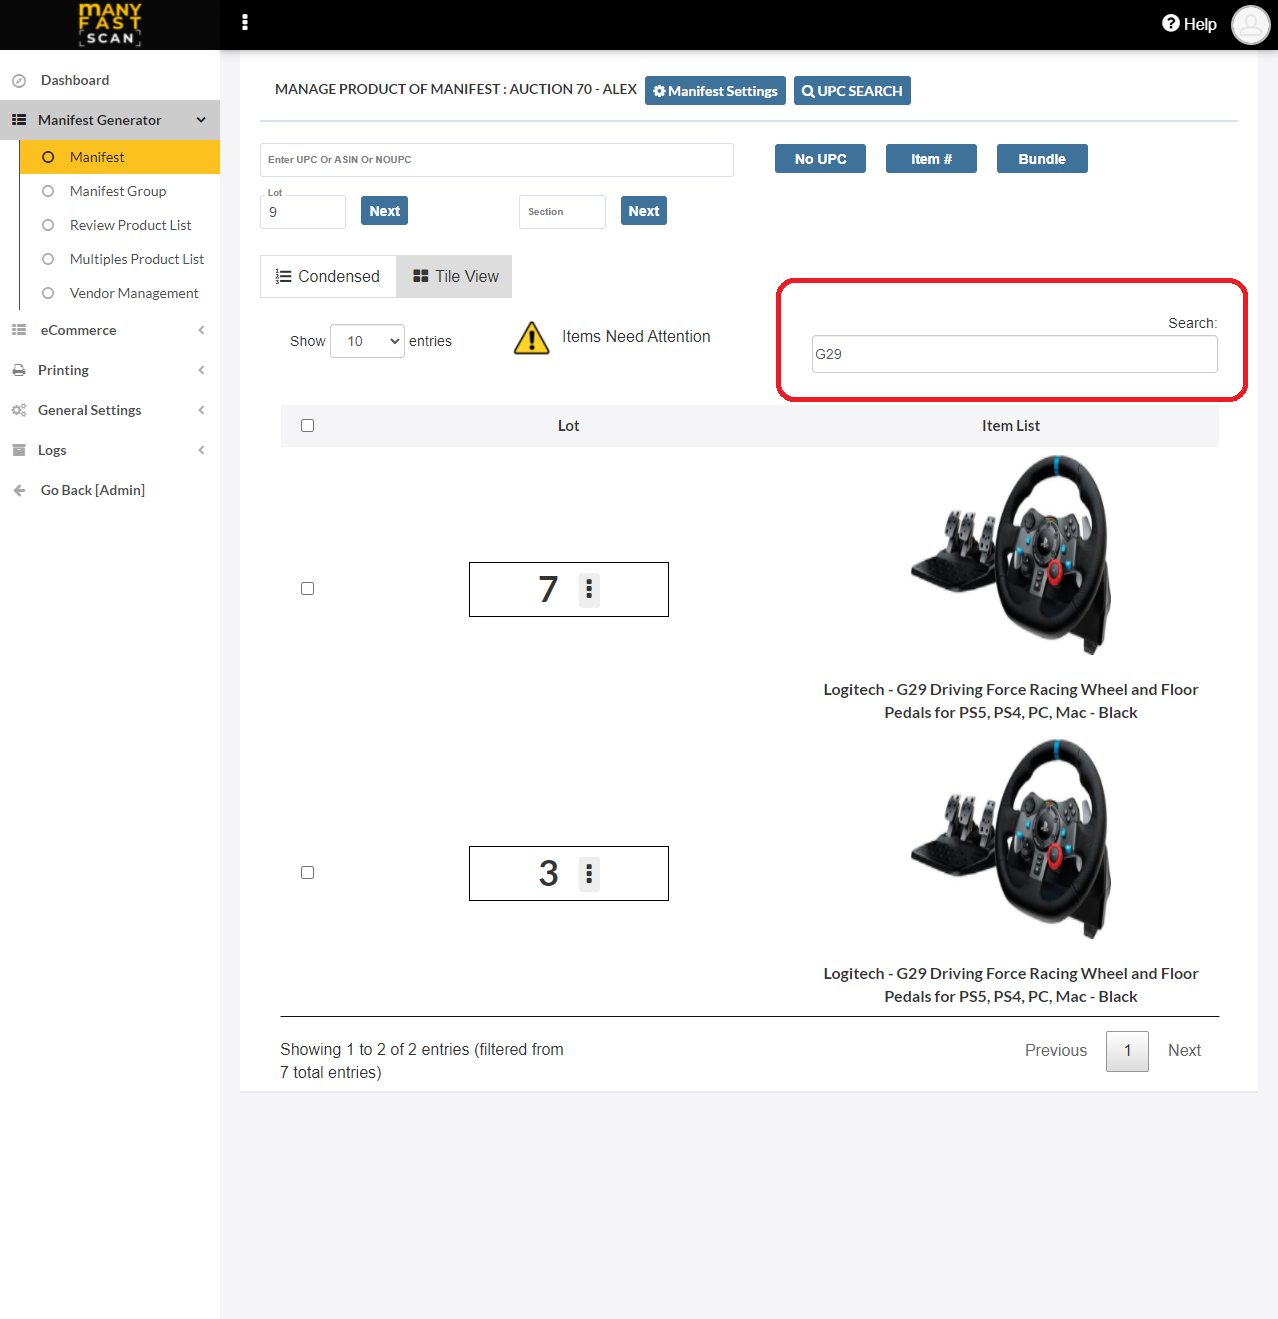
¶ Filter Manifest items
You can filter the Manifest items by searching for keywords. Filters are applied to manifest item title and manifest item description properties.
- In main menu, select the Manifest Generator menu option
- Select Manifest option
- Click on specific Manifest
- Enter filter keyword in search textbox

_-_copy.png?style=centerCustomCss)
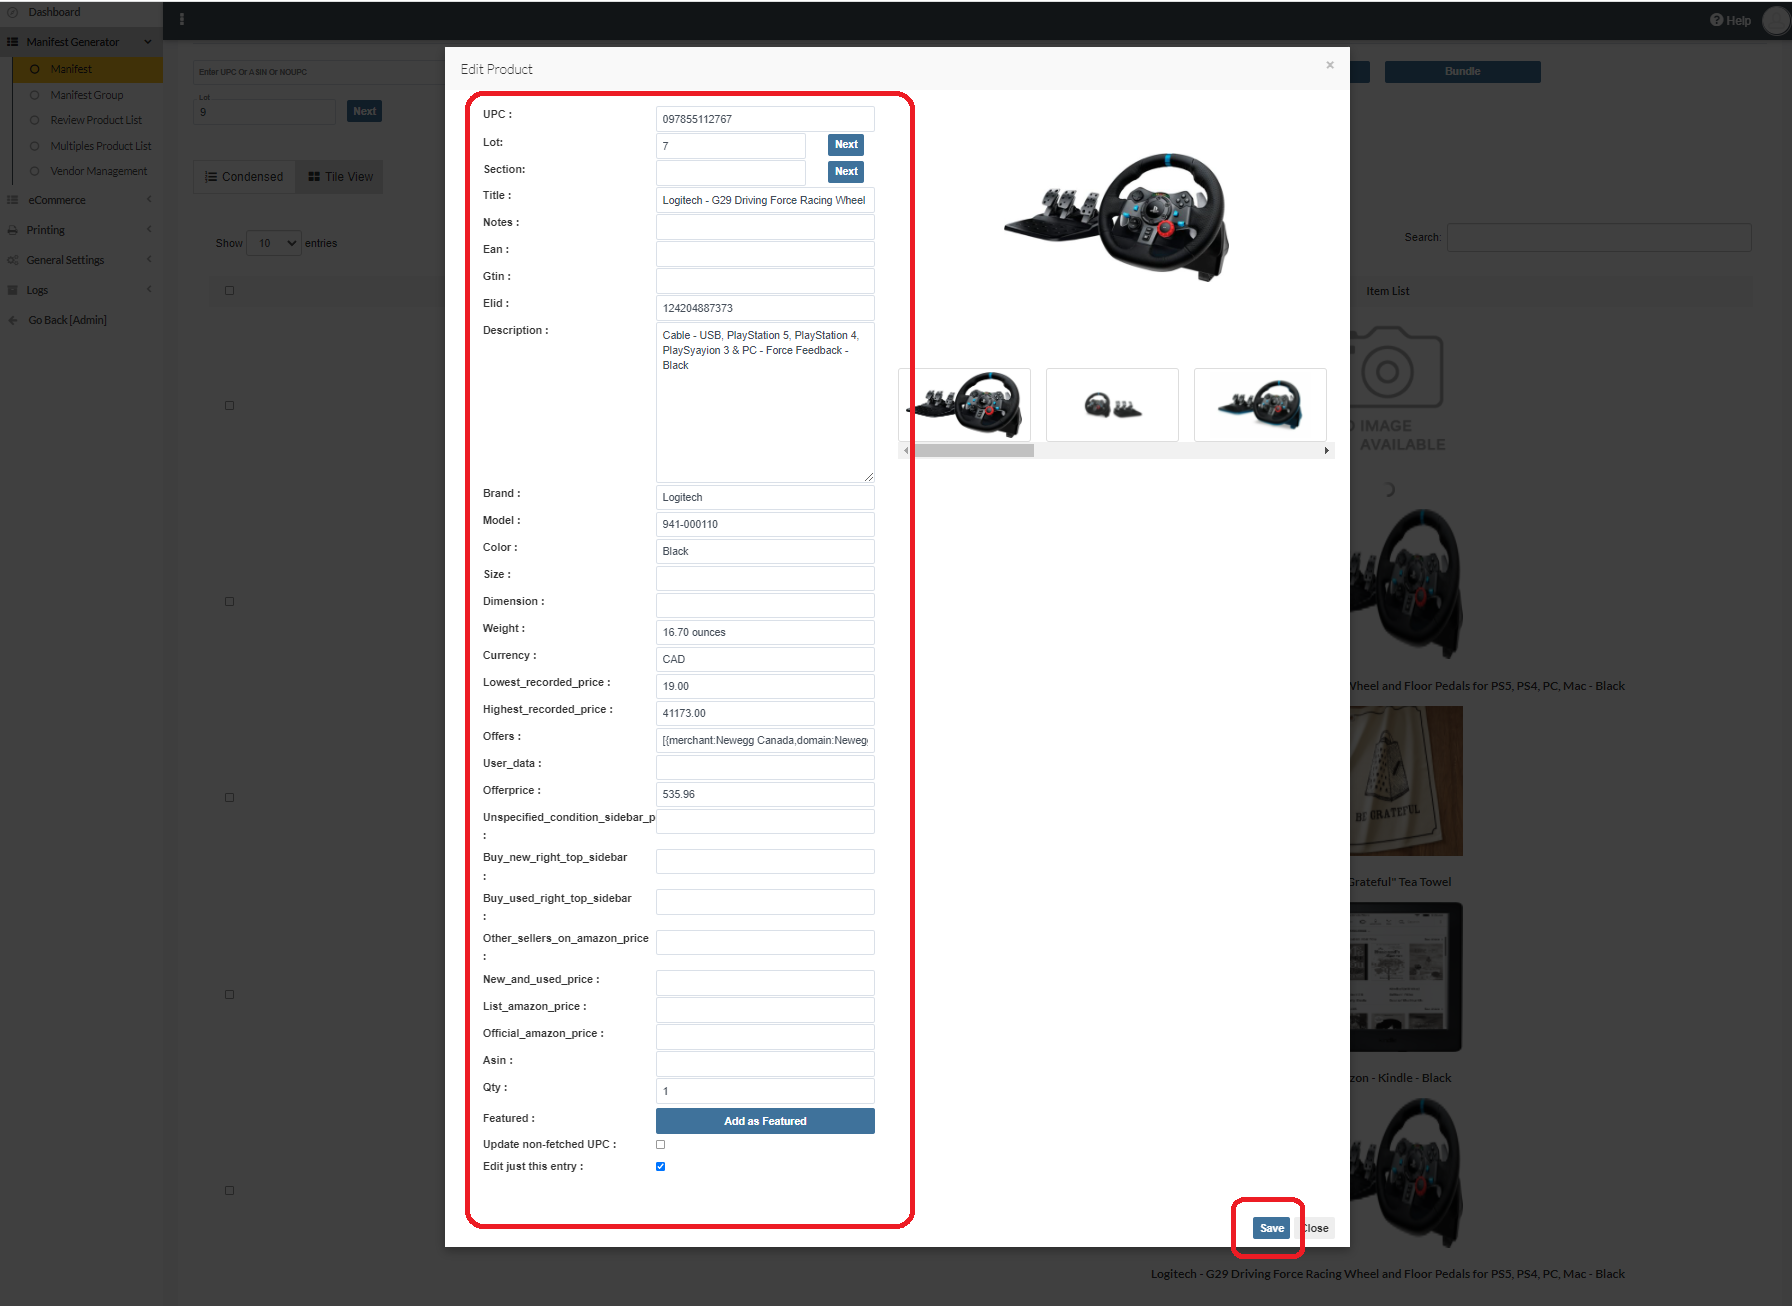
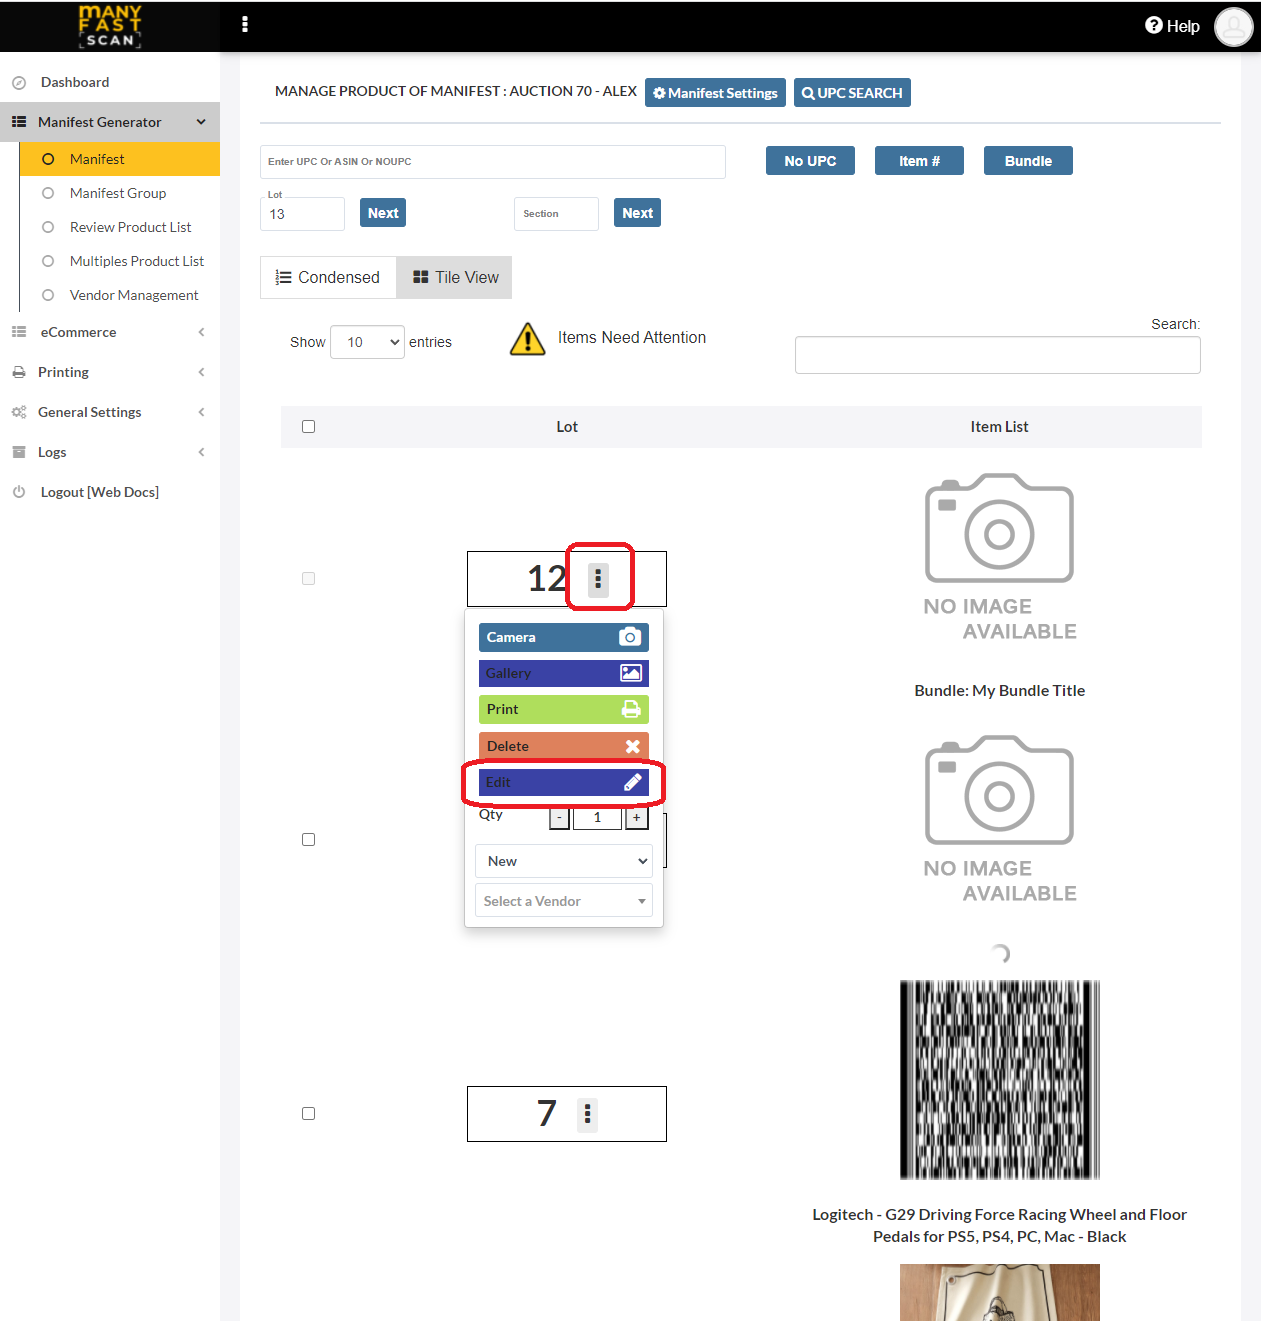
¶ Edit Manifest Item
To edit Manifest item properties follow the following steps:
- In main menu, select the Manifest Generator menu option
- Select Manifest option
- Click on specific Manifest

- Click on More Options (three vertical dots) button next to Manifest item Lot and Section of the Manifest item card
- Click Edit
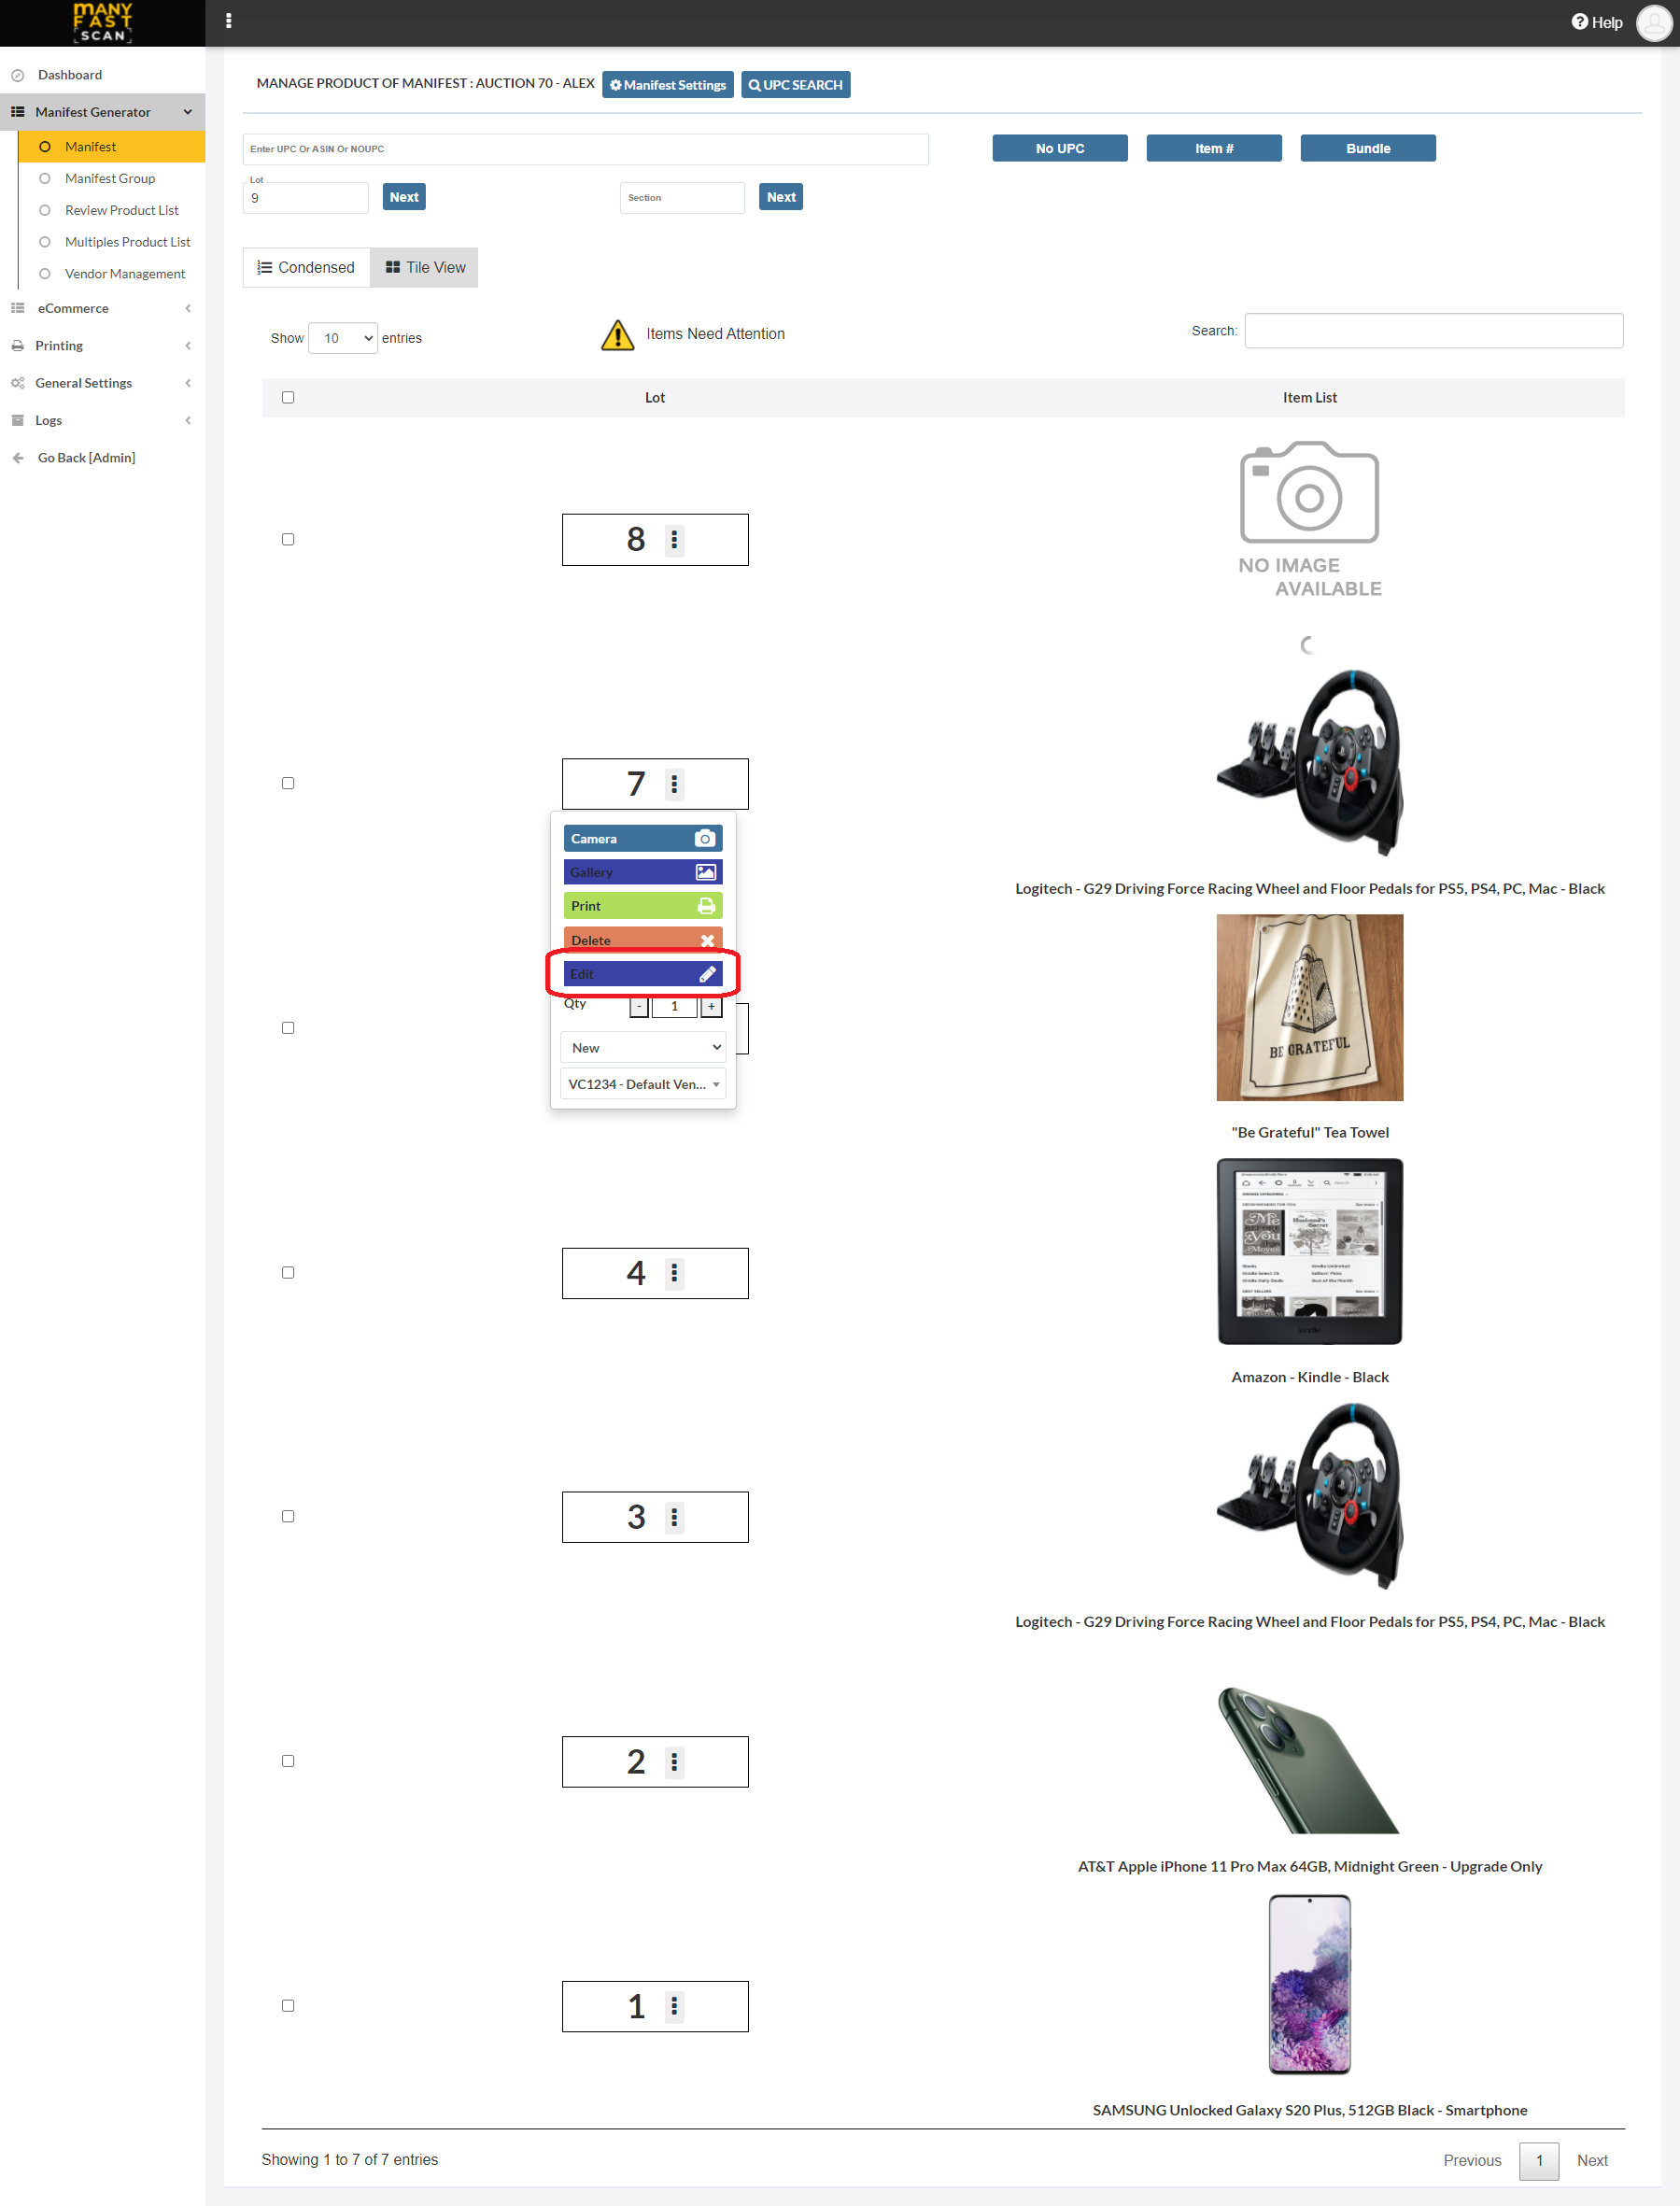
- Edit the Manifest item details
- Click Save
¶ Add Photos to Manifest Item
You can add additional photos to already existing manifest item by doing the following:
- In main menu, select the Manifest Generator menu option
- Select Manifest option
- Click on specific Manifest
- Click on More Options (three vertical dots) button next to Manifest item Lot and Section of the Manifest item card
- Click Camera
- Take or Select Photos From Camera
- Photos will be automatically uploaded
- Click Close when done
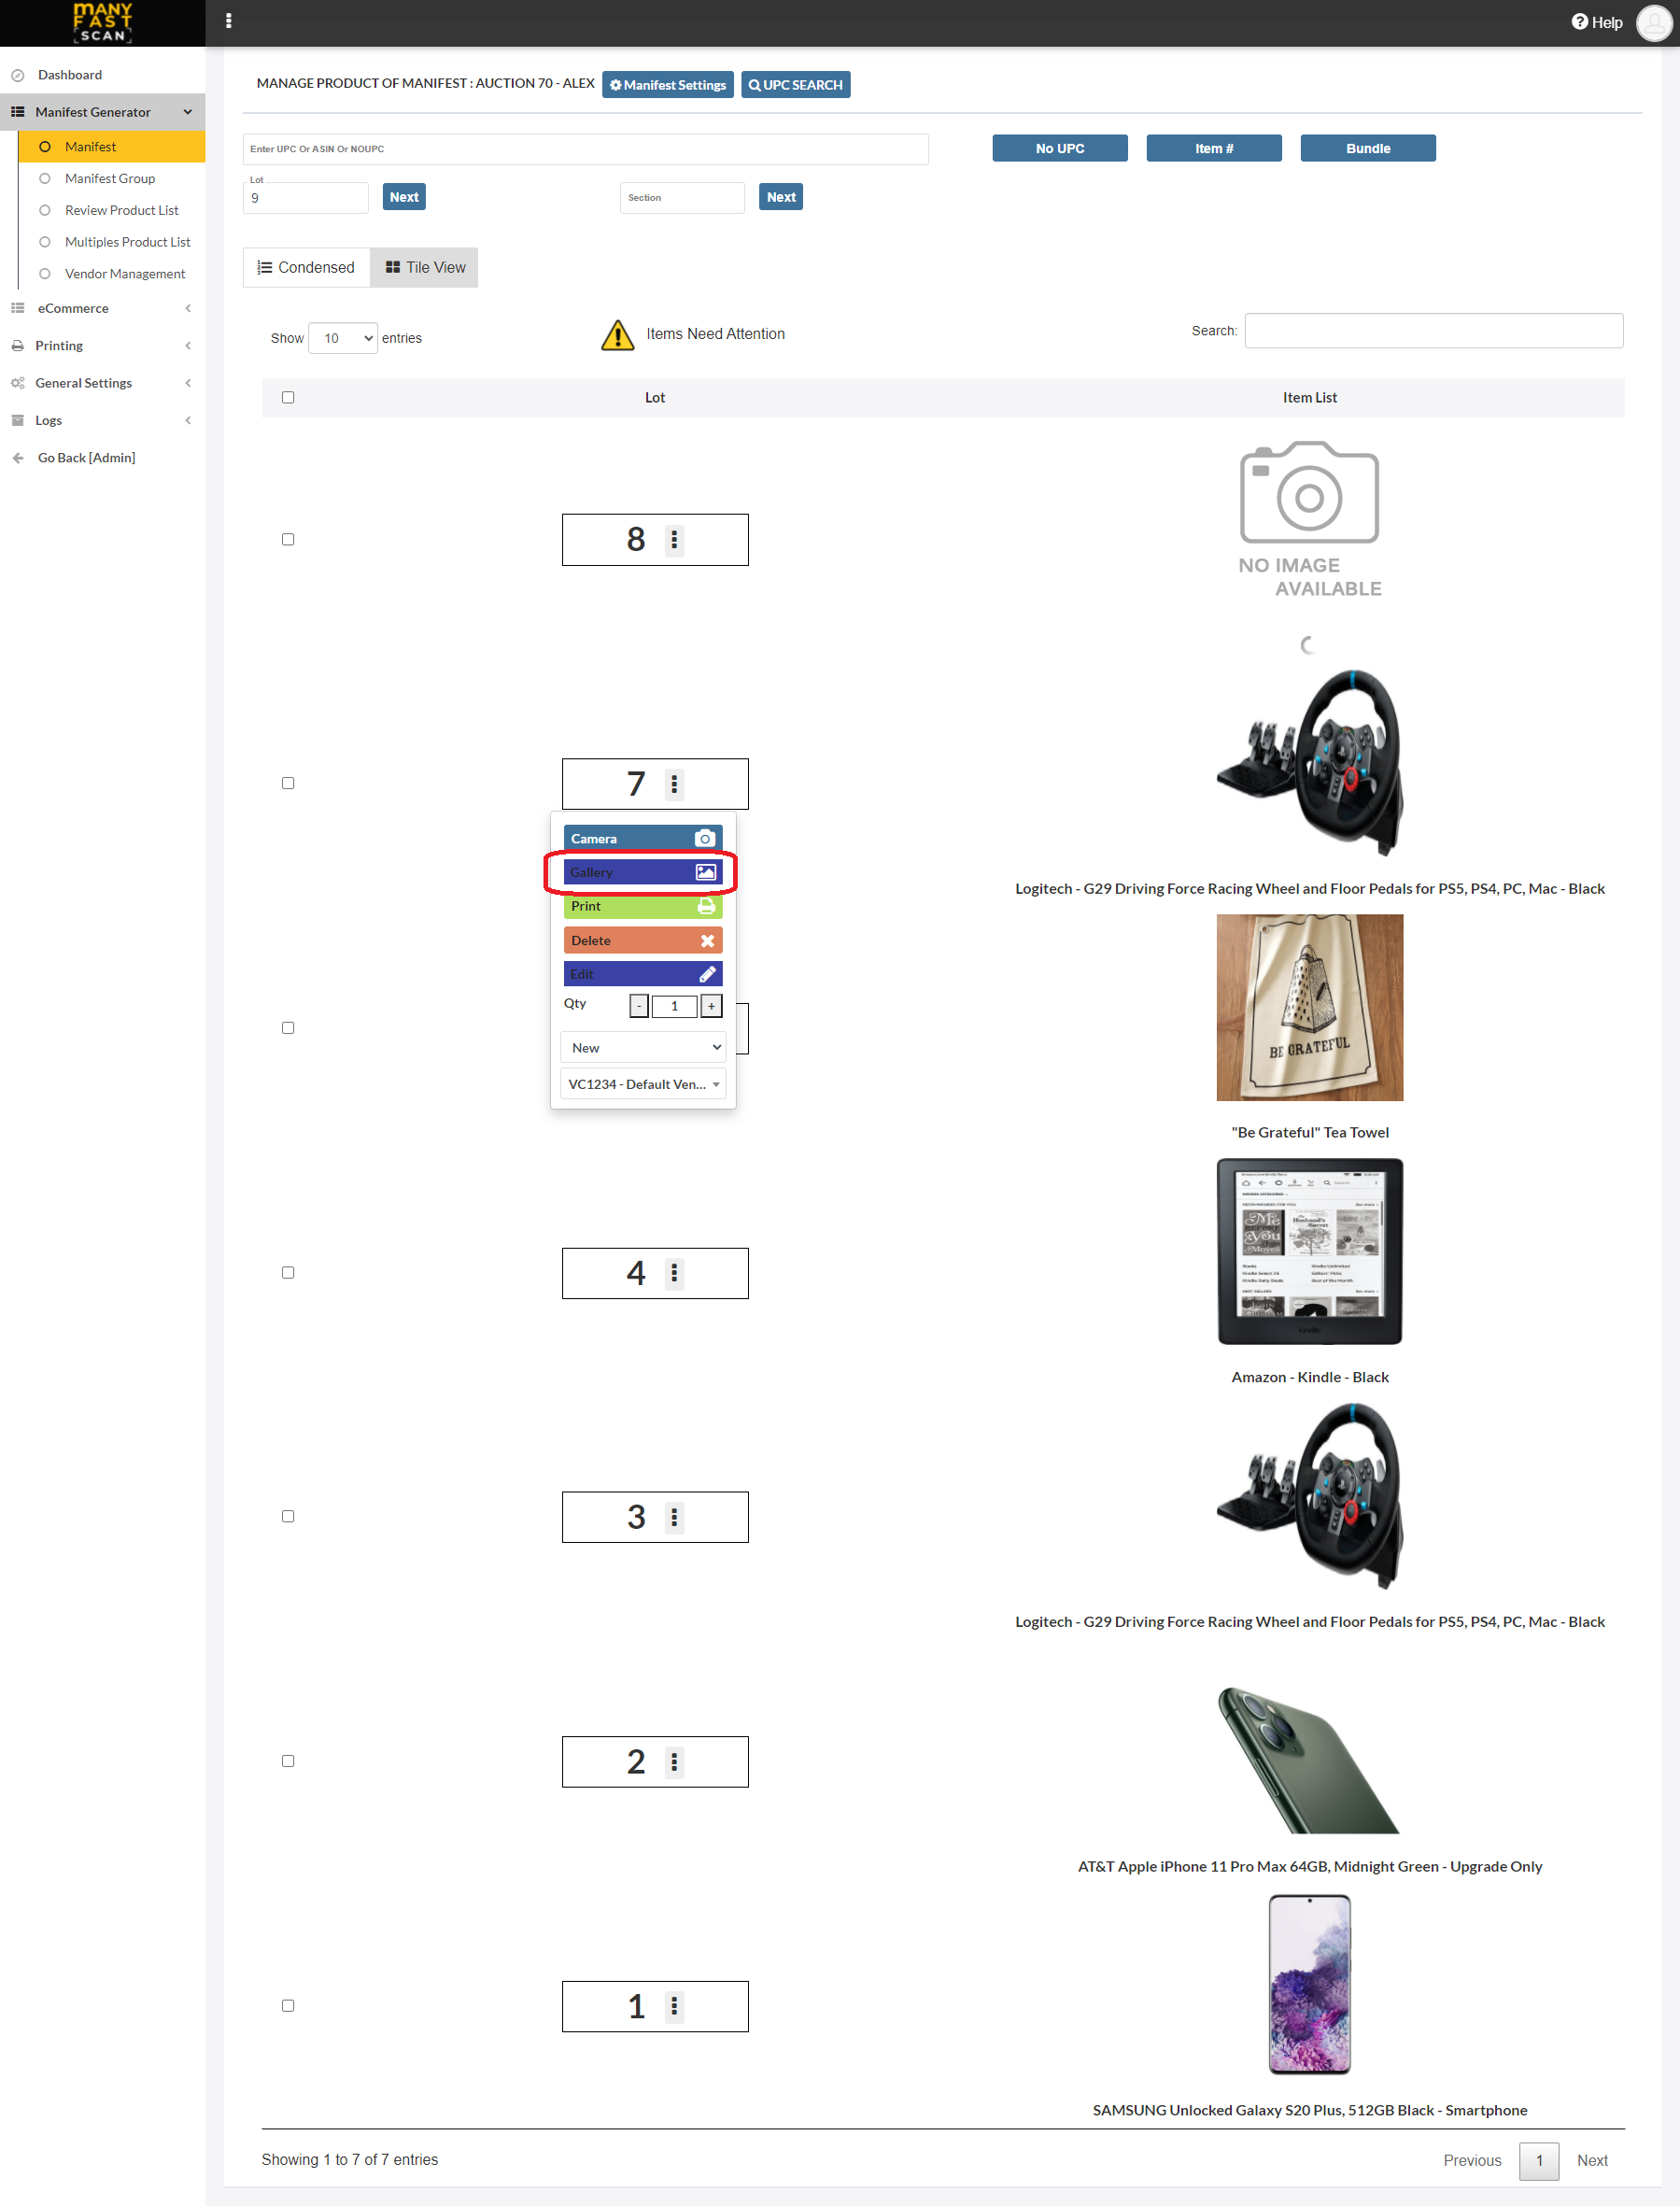
¶ View and Delete Photos for Manifest Item
You can see and delete photos (external source and user uploaded) that belong to a manifest item by doing the following:
- In main menu, select the Manifest Generator menu option
- Select Manifest option
- Click on specific Manifest
- Click on More Options (three vertical dots) button next to Manifest item Lot and Section of the Manifest item card
- Click Gallery
- Delete images by clicking red x button on top of photo
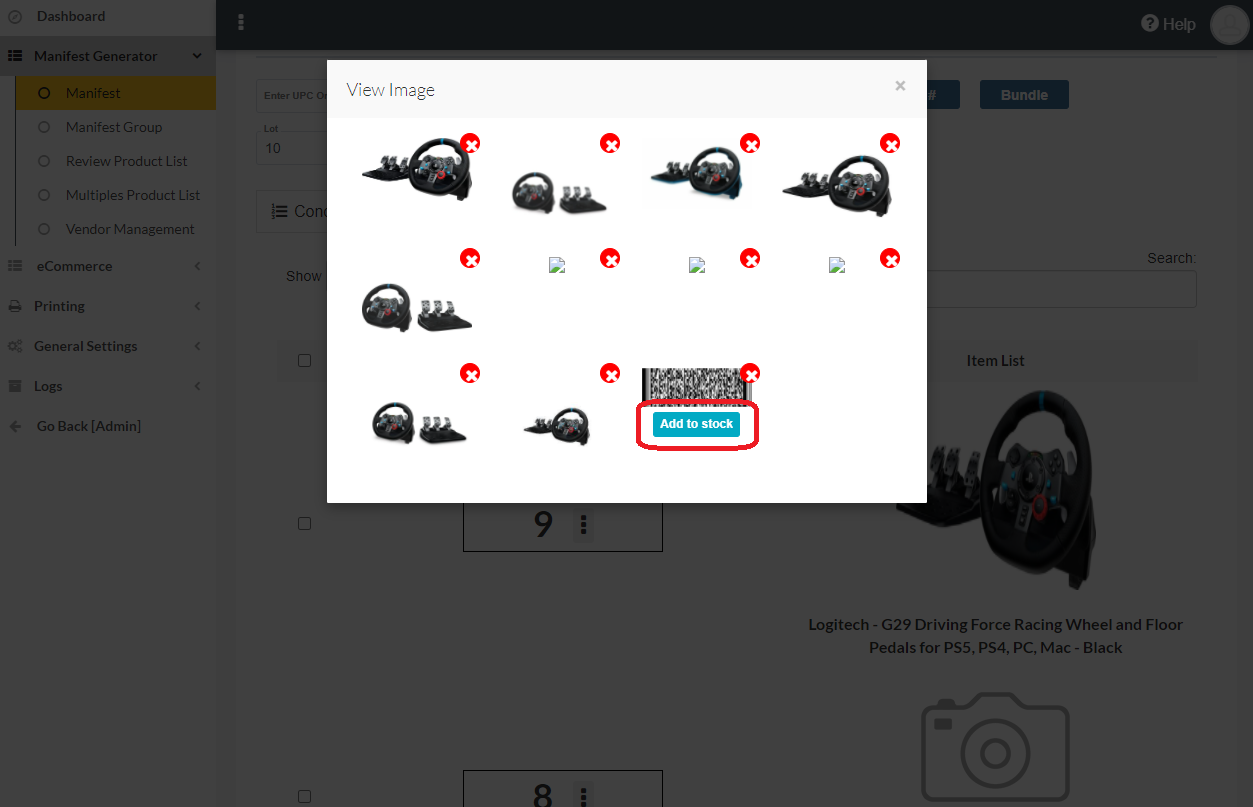
¶ Add User Uploaded Photo to Stock - Manifest Item
Stock photos are those that will automatically show up when UPC is scanned. If you have an UPC that you know you will scan multiple times, you can upload photos for that UPC once, mark them as stock photos and they will automatically show up as stock photos for next scan of that UPC.
To add user uploaded photo as stock photo, do the following:
- In main menu, select the Manifest Generator menu option
- Select Manifest option
- Click on specific Manifest

- Click on More Options (three vertical dots) button next to Manifest item Lot and Section of the Manifest item card
- Click Gallery
- Click Add to stock for user images you want to add as stock photos.
¶ Video Guide
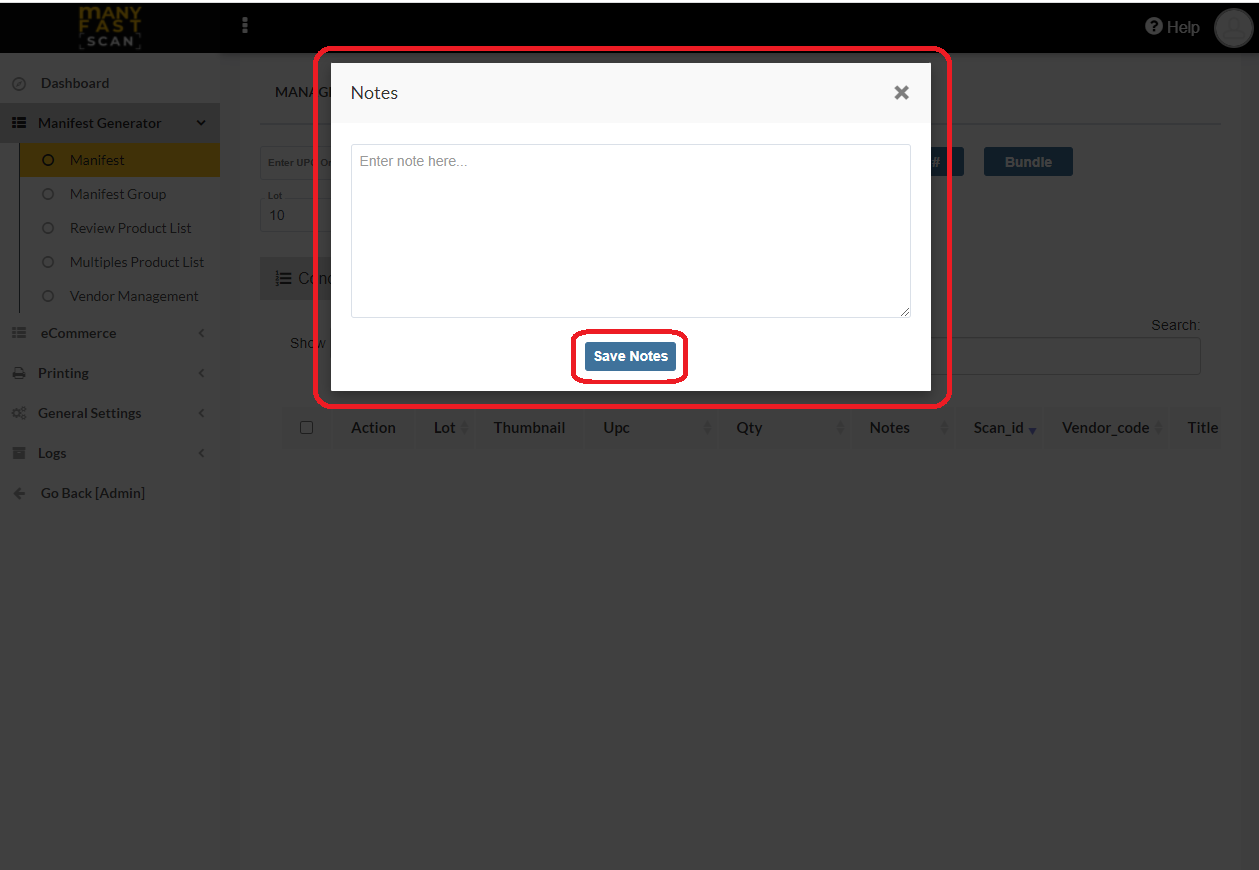
¶ Add or modify Notes
You can quickly add or modify a note to Manifest item, without using the edit manifest item modal.
To add or modify a note for Manifest item, do the following:
- In main menu, select the Manifest Generator menu option
- Select Manifest option
- Click on specific Manifest

- Click Add Notes
- Add or change the notes value.
- Click Save Notes
¶ Add Multiples
If you more than one of some product, you can scan the first one and use Add multiples functionality to add all the identical items you have in inventory to new manifest called "<original manifest name>_Multiples". You can space them out so they aren't in successive order and additionally you can set the different starting lot and section for multiples.
- In main menu, select the Manifest Generator menu option
- Select Multiples Product List option
- Input the desired parameters.
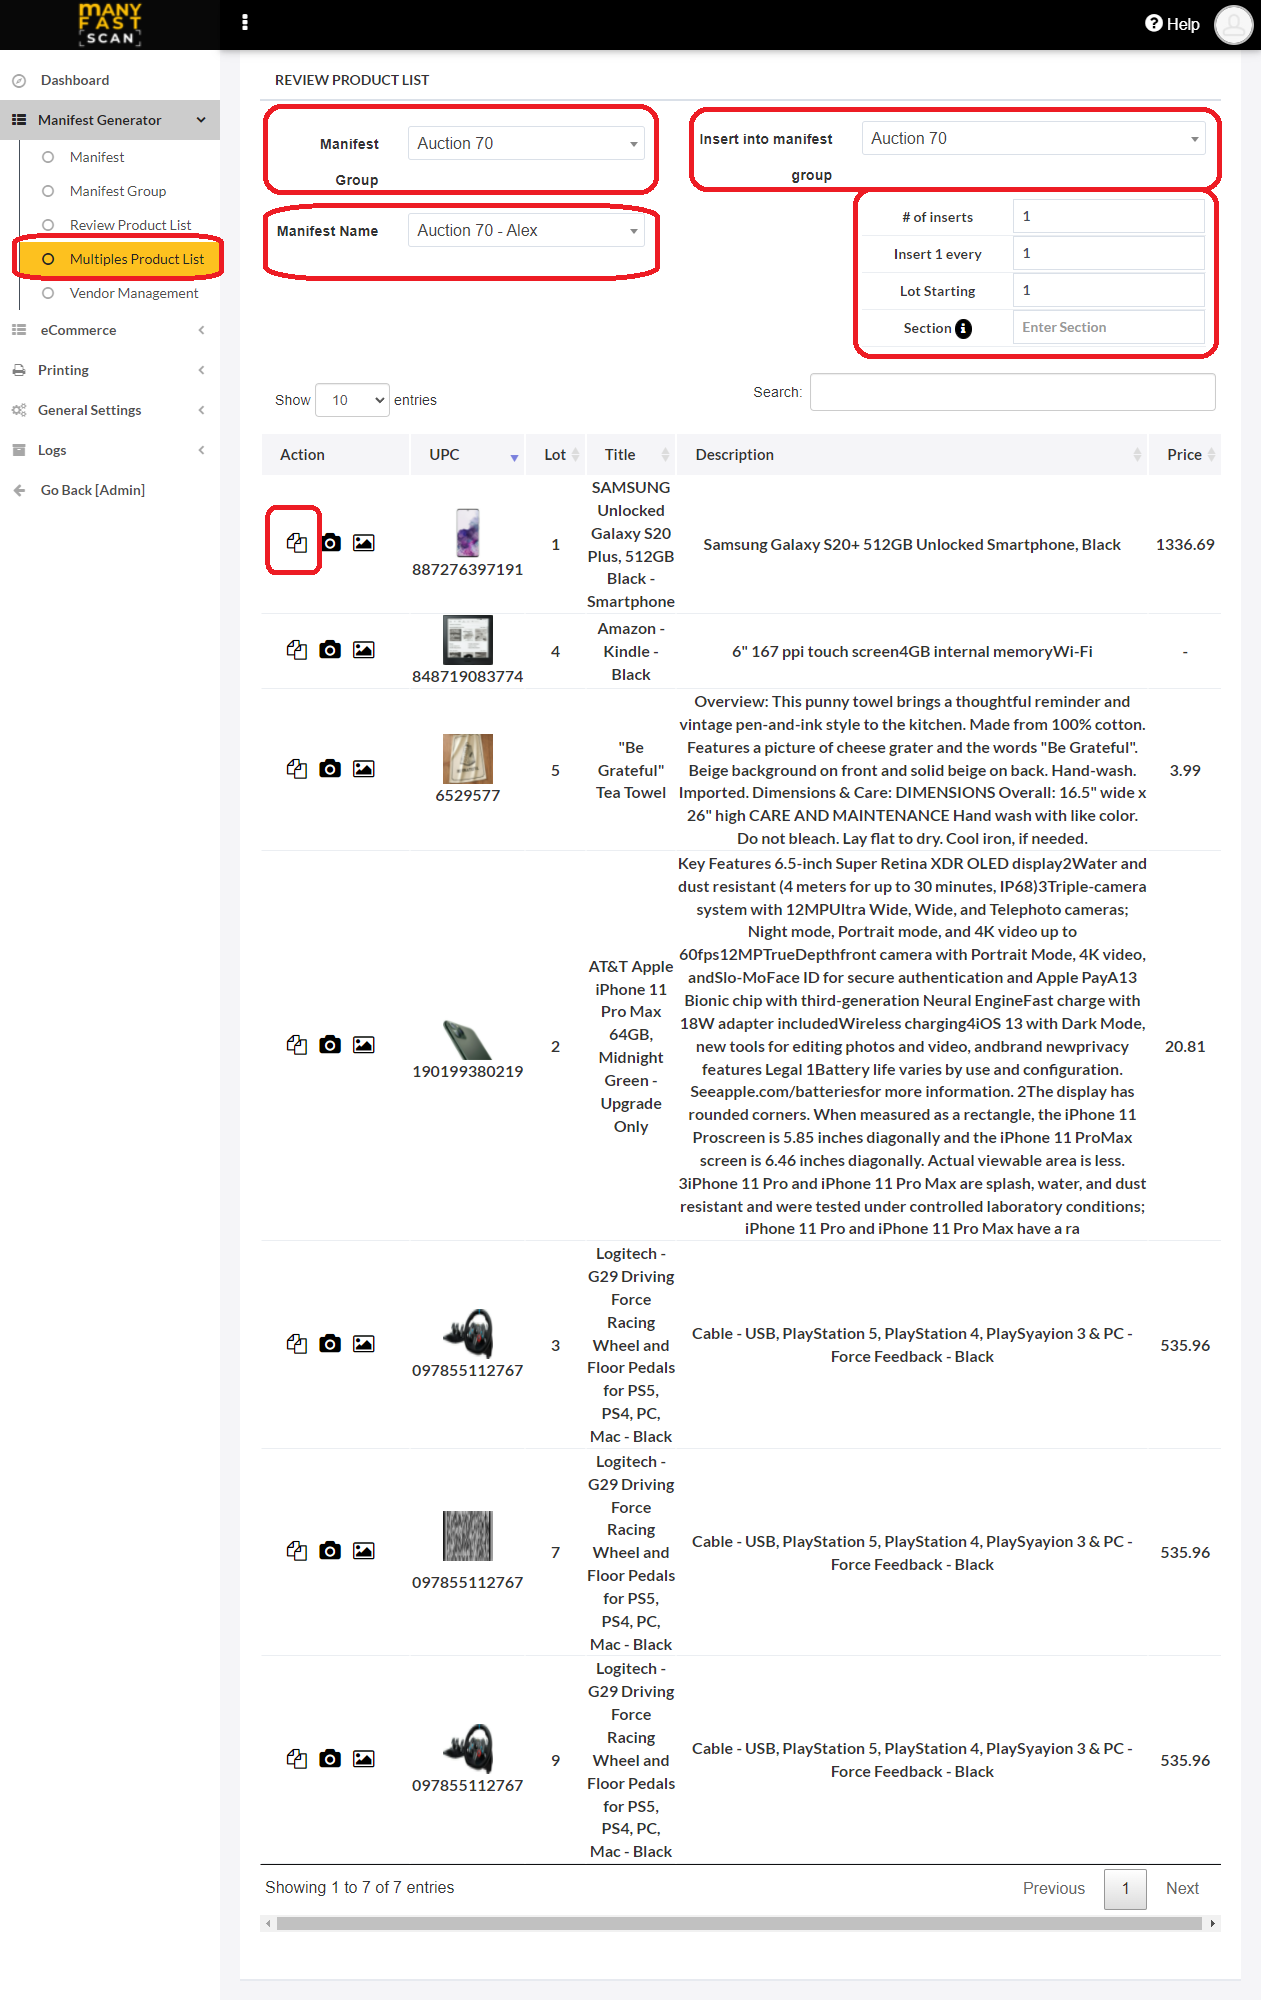
- Click Save Changes
¶ Video Guide
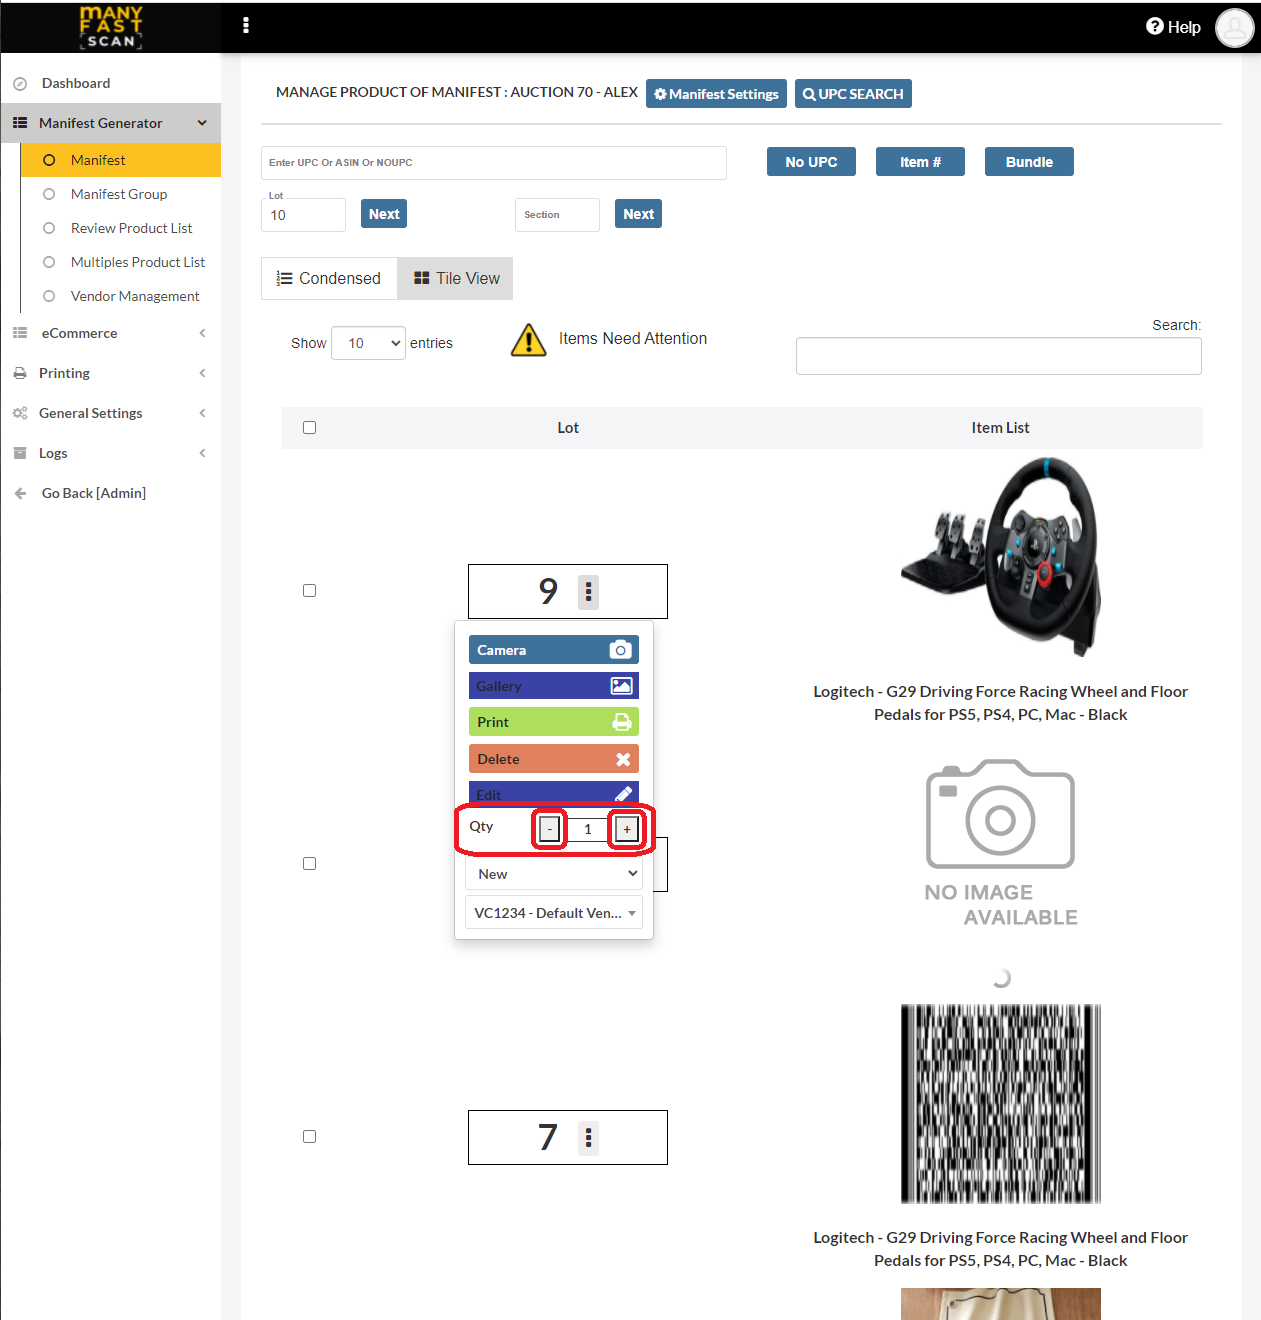
¶ Modify quantity
You can quickly modify quantity for a Manifest item, without using the edit manifest item modal.
To modify quantity for a Manifest item, do the following:
- In main menu, select the Manifest Generator menu option
- Select Manifest option
- Click on specific Manifest
- Click on More Options (three vertical dots) button next to Manifest item Lot and Section of the Manifest item card
- Click on + and - buttons to increase and decrease quantity
- Changes are automatically applied
- Changes are automatically applied
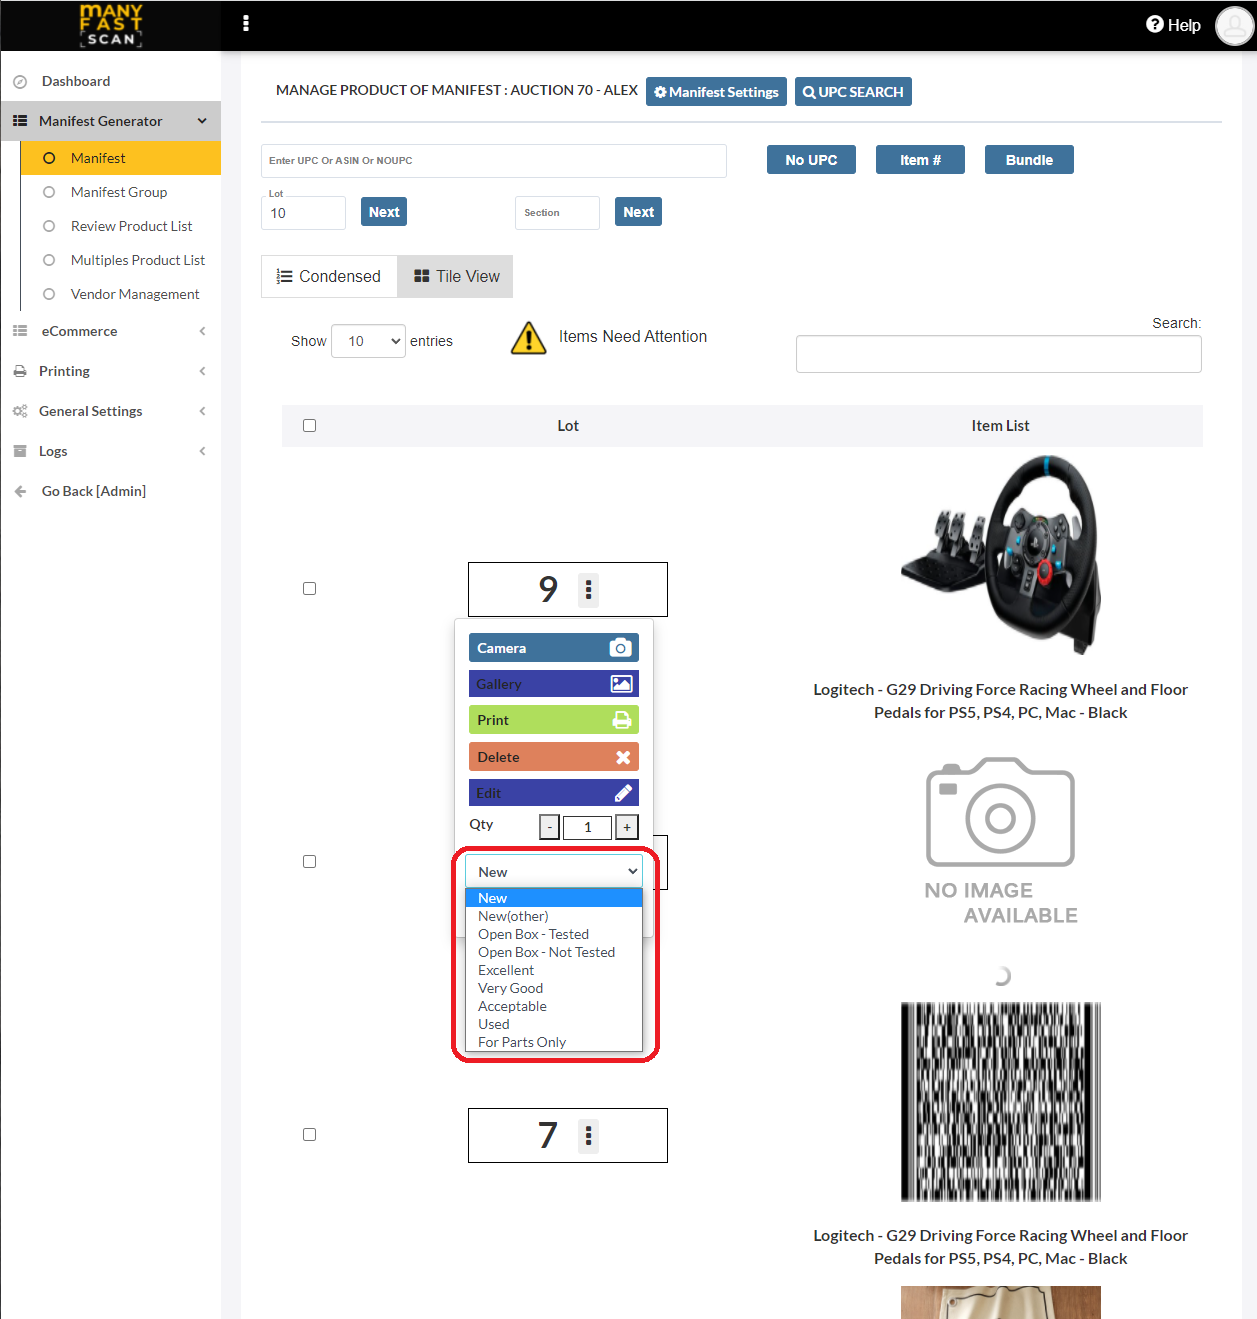
¶ Change condition
You can quickly change condition for Manifest item.
To change condition for a Manifest item, do the following:
- In main menu, select the Manifest Generator menu option
- Select Manifest option
- Click on specific Manifest
- Click on More Options (three vertical dots) button next to Manifest item Lot and Section of the Manifest item card
- Click on condition dropdown and select a new condition
- Changes are automatically applied
- Changes are automatically applied
¶ Delete Manifest item
Please make sure that you actually want to delete the manifest item as the action is not reversible.
To delete a Manifest item follow the following steps:
- In main menu, select the Manifest Generator menu option
- Select Manifest option
- Click on specific Manifest

- Click on More Options (three vertical dots) button next to Manifest item Lot and Section of the Manifest item card
- Click Delete
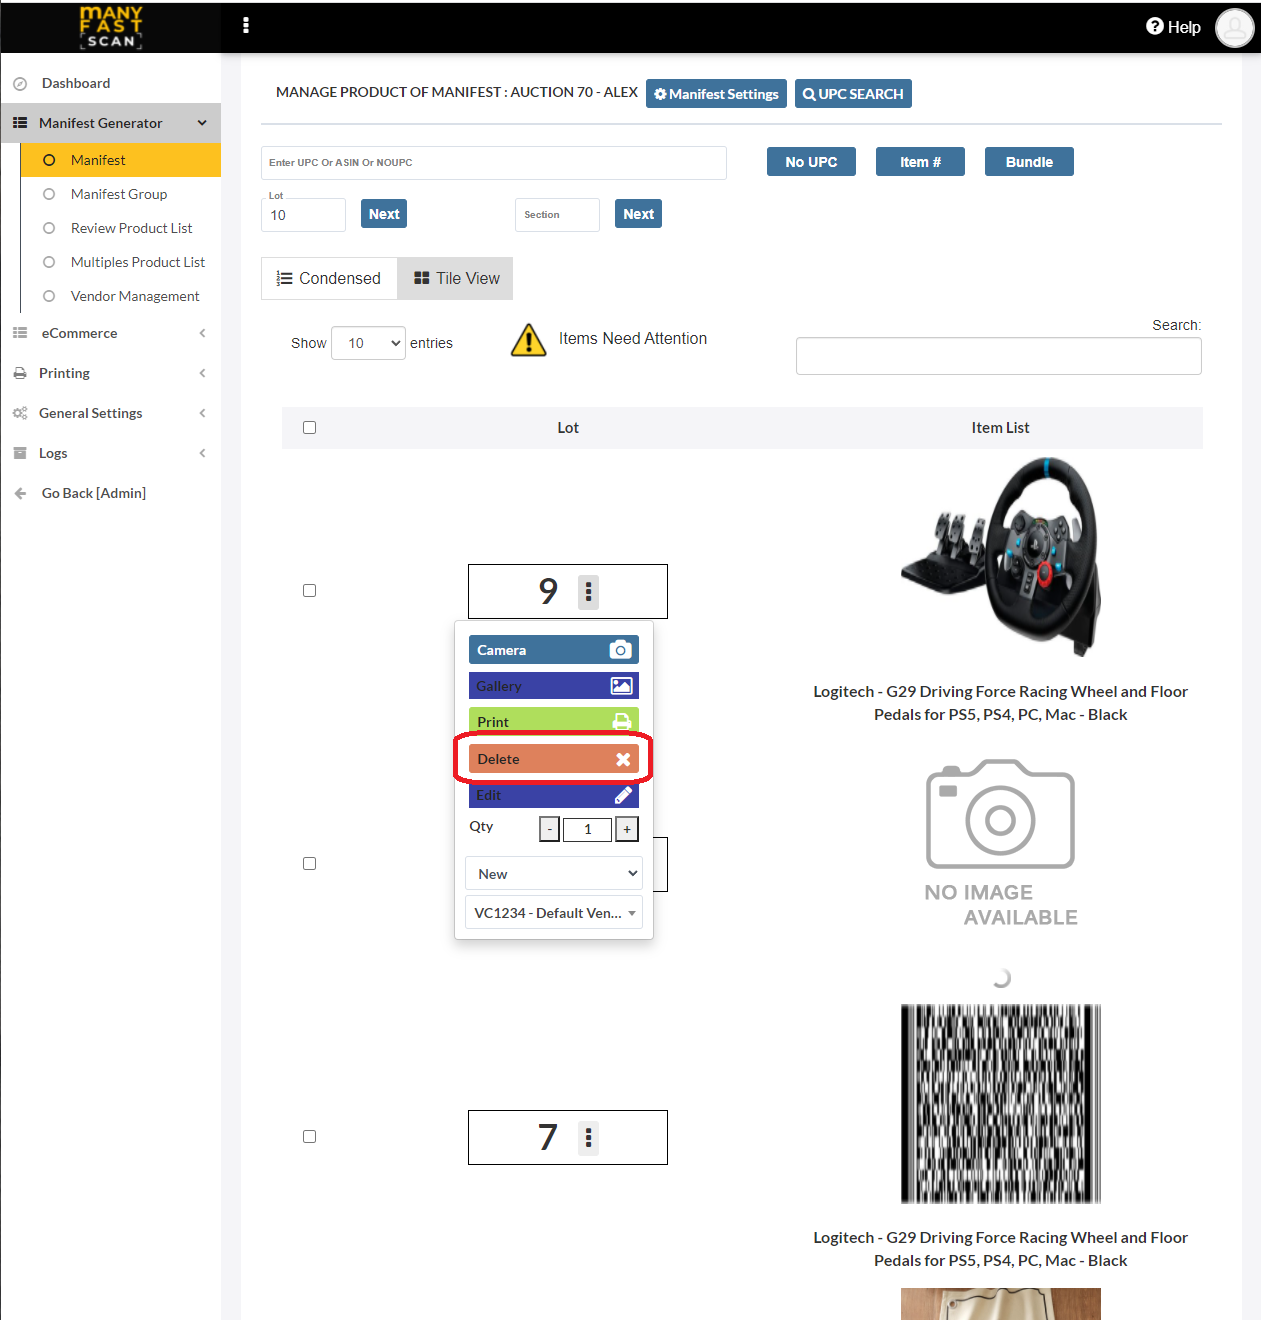
- Confirm by pressing Delete
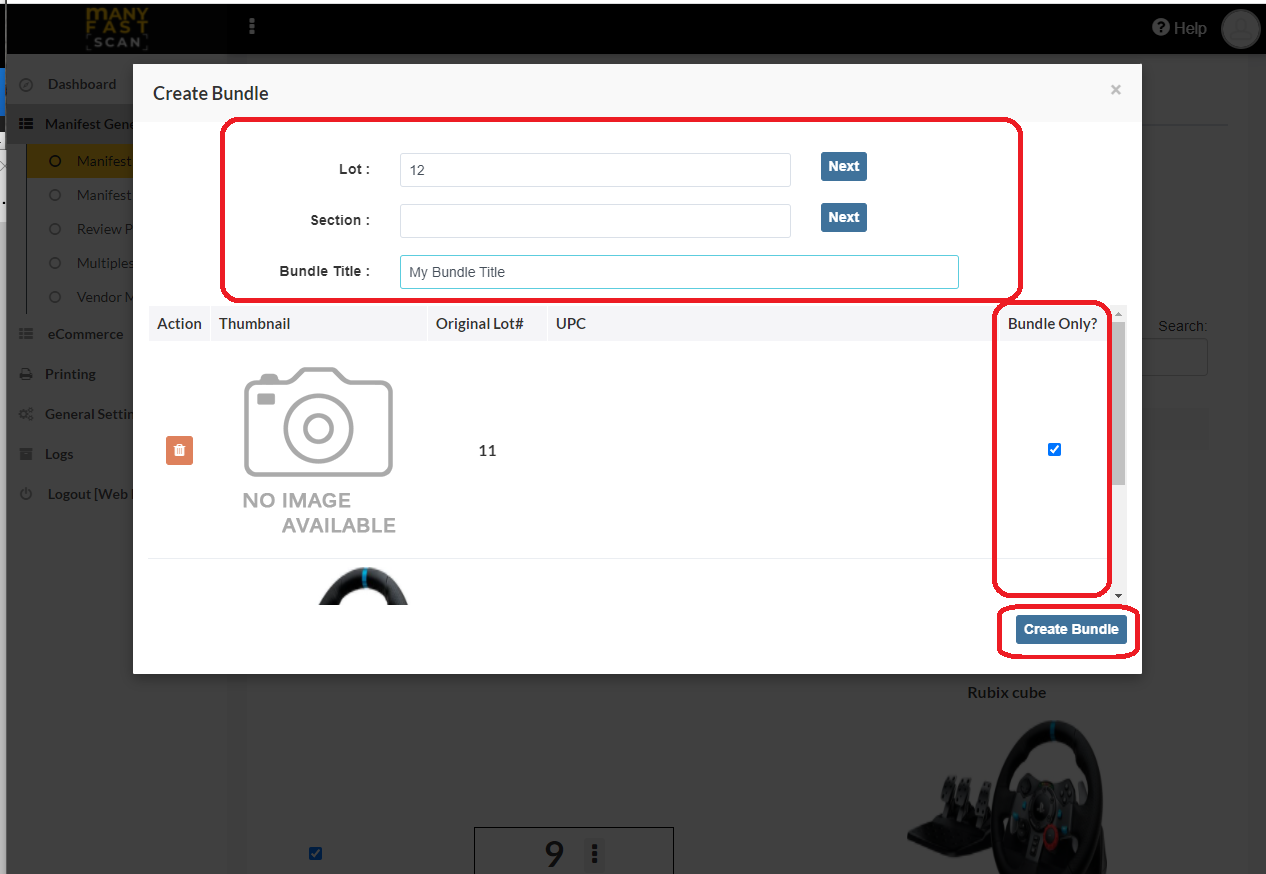
¶ Create a Bundle Manifest item
Bundles are used to group multiple items into a single container of items, called bundle. When adding a bundle, you can select whether you want these manifest items to exist in a bundle only or both in a bundle and in manifest.
To add a Bundle item, follow the following steps:
- In main menu, select the Manifest Generator menu option
- Select Manifest option
- Click on specific Manifest

- Select all the items you want to add to bundle by clicking the checkbox next to the item
- Click the Bundle button
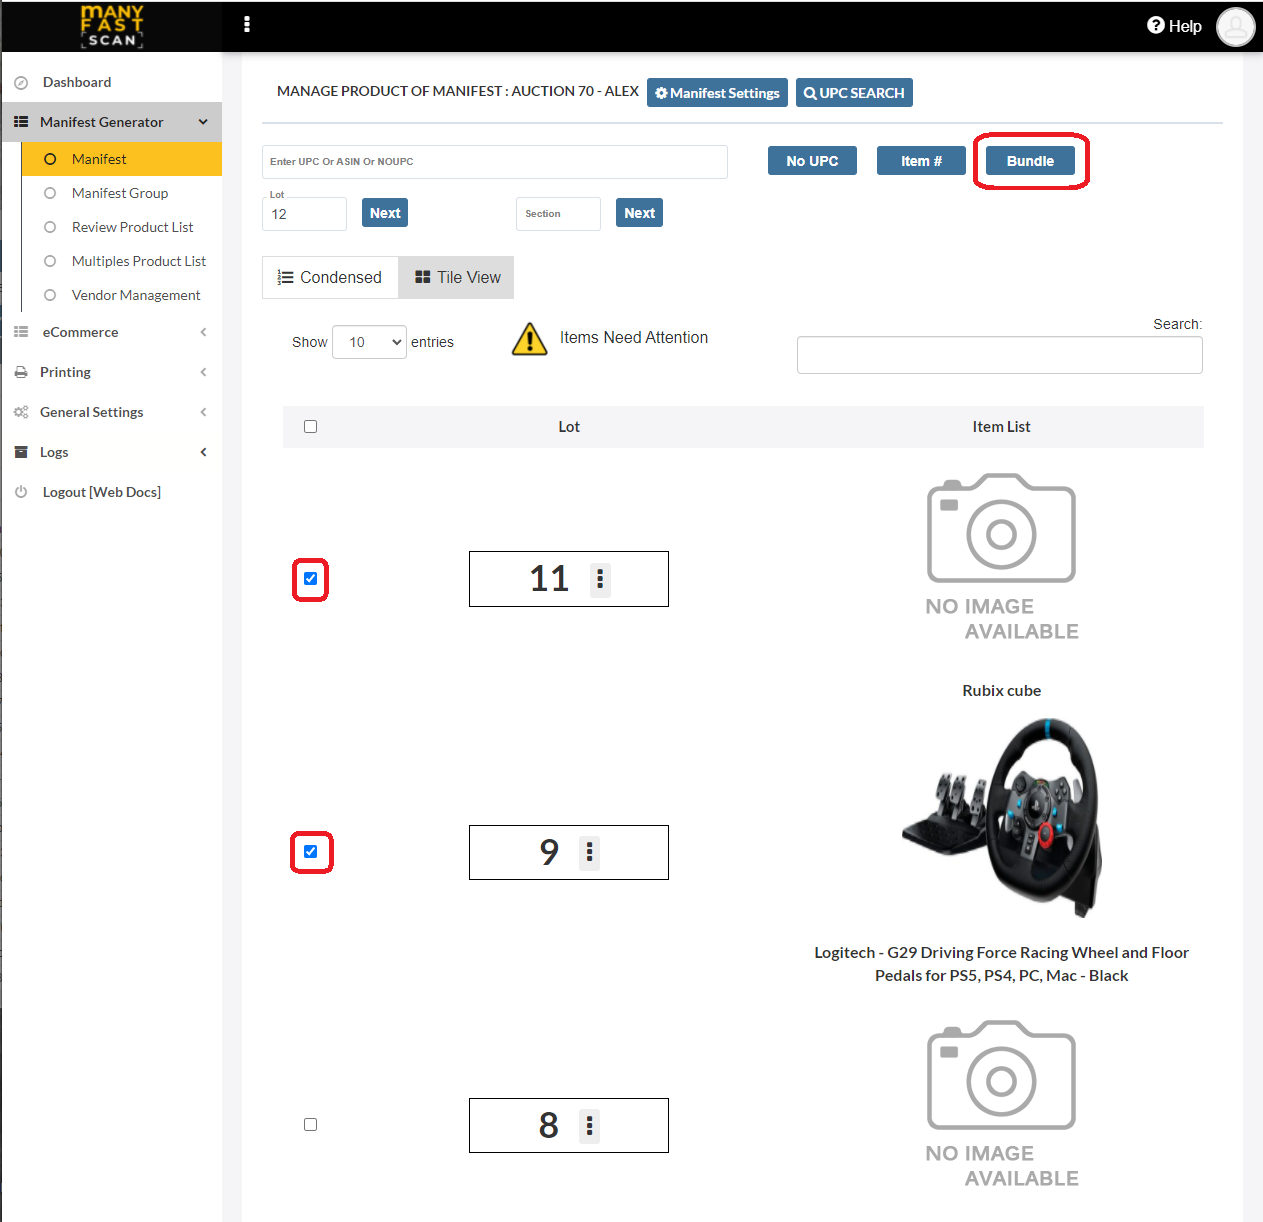
- Specify if the manifest items are bundle only or not
- Provide the bundle lot number, section and title.
- Click Create Bundle
- Upload photos by either choosing the ones already taken or taking new ones
- Click on Next after you are done uploading photos
- Input More Details for the new Manifest item
- Depending on your settings, you will either need to press on Save And Print or Save.
¶ Video Guide
¶ Add Manifest item to existing Bundle Manifest item
After you created a bundle, you can continue adding items to it by doing the following:
- In main menu, select the Manifest Generator menu option
- Select Manifest option
- Click on specific Manifest

- Click on More Options (three vertical dots) button next to Manifest item Lot and Section of the Manifest item card
- Click Edit
- Click on Add UPC
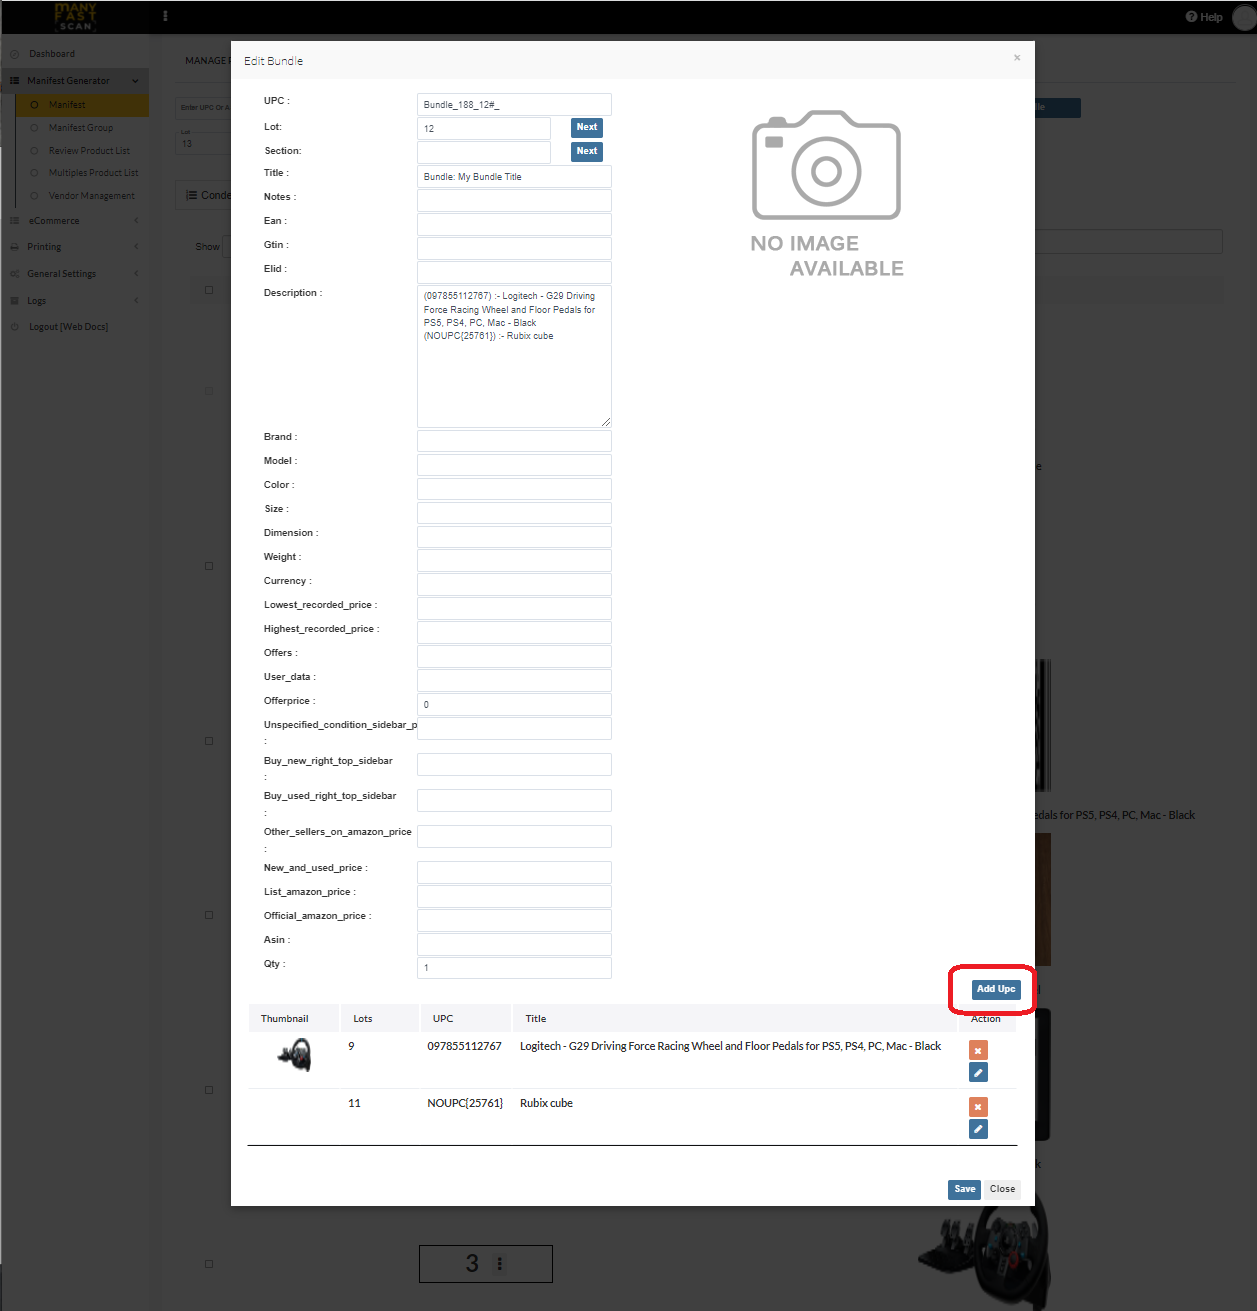
- Select the items to add to bundle
- Click Add
¶ Video Guide
¶ Edit Manifest item in a Bundle Manifest item
After you created a bundle, you can edit the individual manifest items by doing the following:
- In main menu, select the Manifest Generator menu option
- Select Manifest option
- Click on specific Manifest

- Click on More Options (three vertical dots) button next to Manifest item Lot and Section of the Manifest item card
- Click Edit
- Click Edit on manifest item to open an edit modal
- Edit Manifest Item details
- Click Save
¶ Video Guide
¶ Delete a Manifest item in a Bundle Manifest item
After you created a bundle, you can delete the individual manifest items by doing the following:
- In main menu, select the Manifest Generator menu option
- Select Manifest option
- Click on specific Manifest

- Click on More Options (three vertical dots) button next to Manifest item Lot and Section of the Manifest item card
- Click Edit
- Click Delete on manifest item
- Confirm by pressing Delete